Updated for Version 5.7

Clorinde is a 5★ Electro Sword character in Genshin Impact who is an on-field damage dealer. Her gun-and-lunge gameplay offers a fast-paced and interactive experience that lets her excel in combat and exploration. Learn about Clorinde’s best builds, best weapons, best artifacts, and best teams in this quick guide.
Note that the information given may change if new discoveries are made. More extensive testing is in progress.
The full-length guide is currently being written. Join our Discord to participate in the theorycrafting process.
Table of Contents
Infographic
Credits to: euphorysm, cegewinne, plumetra, mikeskies, breadcatow, and KQM Staff
Character Overview
Pros
- Flexible on-field damage dealer that can fit into many team archetypes
- Medium-range abilities with large AoE and high mobility during her special Skill state provide the potential to avoid incoming attacks without losing damage uptime with smart maneuvering of her Skill lunges
- Frequent self-healing allows her to sustain her HP without needing a healer in the team
- Fast, Normal Attack–coded animations and damage allow her to drive the abilities of off-field party members, such as Fischl’s C6
Cons
- Long Skill cooldown relative to Skill duration
- No inherent interruption resistance without Constellations
- Cannot reach max damage potential on mobile (cannot queue attacks) or with high ping (delayed inputs / Bond of Life registration)
- Somewhat reliant on 4-star teammate Constellations for maximizing team damage (e.g. C6 Fischl, C6 Kujou Sara, or C6 Chevreuse)
Playstyles
On-Field DPS
Clorinde fulfills the role of on-field damage dealer. She is highly mobile while in her special Skill state, but requires proactive positioning to make use of that mobility without losing damage uptime.
Talents
Level and Talent Priority
Character Level ≥ Skill > Burst
Clorinde does not use her Normal Attack Talent as part of her main playstyle.
Talent Overview
 Normal Attack | Oath of Hunting Shadows
Talent Description
Normal Attack
Performs up to 5 rapid strikes.
Charged Attack
Consumes a certain amount of Stamina and fires Suppressing Shots in a fan pattern with her pistolet.
Plunging Attack
Plunges from mid-air to strike the ground below, damaging opponents along the path and dealing AoE DMG upon impact.
Clorinde has flashy Normal Attacks and Charged Attacks that deal Physical damage. They are not used rotationally, save for potentially weaving in a Normal Attack to trigger, for example, Fischl’s C6 or apply Pyro via Bennett’s C6.
Clorinde does not benefit from her Normal Attack Talent as her special Skill state comes with its own set of Talent multipliers. Normal Attack Talent levels do not increase the damage of her Normal Attacks while in her special Skill state.
 Elemental Skill | Hunter’s Vigil
Talent Description
Preparing her pistolet, she enters the “Night Vigil” state, using steel and shot together. In this state, Clorinde’s Normal Attacks will be transformed into “Swift Hunt” pistolet attacks, and the DMG dealt is converted into Electro DMG that cannot be overridden by infusions, and she will be unable to use Charged Attacks. Using her Elemental Skill will transform it into “Impale the Night”: Perform a lunging attack, dealing Electro DMG. The DMG done through the aforementioned method is considered Normal Attack DMG.
Swift Hunt
- When her Bond of Life is equal to or greater than 100% of her max HP: Performs a pistolet shot.
- When her Bond of Life is less than 100%, firing her pistolet will grant her Bond of Life, with the amount gained based on her max HP. The shots she fires can pierce opponents, and DMG dealt to opponents in their path is increased.
Impale the Night
The current percentage value of Clorinde’s Bond of Life determines its effect:
- When the Bond of Life value is 0%, perform a normal lunging strike;
- When the Bond of Life value is less than 100% of her max HP, Clorinde is healed based on the Bond of Life value, and the AoE of the lunging attack and the DMG dealt is increased;
- When the value of the Bond of Life is equal to or greater than 100% of her max HP, use Impale the Night: Pact. The healing multiplier is increased, and the AoE and DMG dealt by the lunge is increased even further.
In addition, when Clorinde is in the Night Vigil state, healing effects other than Impale the Night will not take effect and will instead be converted into a Bond of Life that is a percentage of the healing that would have been received.
Clorinde will exit the “Night Vigil” state when she leaves the field.
Arkhe: Ousia
Periodically, when Clorinde’s Swift Hunt shots strike opponents, she will summon a Surging Blade at the position hit that deals Ousia-aligned Electro DMG.
Upon using Clorinde’s Skill, she enters the “Night Vigil” state, which:
- Converts her NA into ranged Electro pistolet attacks (Swift Hunt)
- Converts her Skill into an Electro lunging attack (Impale the Night)
- Codes her Skill damage as NA damage (but not as a NA animation)
- Causes healing effects to generate BoL based on Clorinde’s Max HP
- Disables her CA (i.e. holding down the attack input will continuously shoot her NA instead)
As the Night Vigil state is a Conversion and not an Infusion, Clorinde’s Electro cannot be overridden by Infusion effects such as Bennett’s C6, and it ends once she leaves the field.
Clorinde builds BoL with her NA and spends BoL with her Skill. The player is incentivized to use Clorinde’s NA when BoL is below 100% and her Skill when BoL is at or above 100%. If there is a healer on the team, there is the potential that healing received while in the Night Vigil state will allow Clorinde to adjust her attack pattern, instead of simply executing N3E on repeat.
 Elemental Burst | Last Lightfall
Talent Description
Grants herself a Bond of Life based upon her own max HP before swiftly evading and striking with saber and sidearm as one, dealing AoE Electro DMG.
Clorinde’s Burst deals 5 instances of damage in a large area in front of her. In addition, it is a source of Bond of Life generation (provides 102% BoL at Talent Level 7), which can potentially allow you to execute an extra Skill lunge before the Night Vigil state ends.
 Ascension 1 Passive | Dark-Shattering Flame
Talent Description
After a nearby party member triggers an Electro-related reaction against an opponent, Electro DMG dealt by Clorinde’s Normal Attacks and Last Lightfall will be increased by 20% of Clorinde’s ATK for 15s. Max 3 stacks. Each stack is counted independently. The Maximum DMG increase achievable this way for the above attacks is 1,800.
Clorinde’s A1 Passive contributes additional ATK scaling to all sources of Electro damage, capped at 3000 ATK at max stacks. The Electro-related reactions do not need to be unique and can be triggered by any party member, making it very easy to reach max stacks.
 Ascension 4 Passive | Lawful Remuneration
Talent Description
If Clorinde’s Bond of Life is equal to or greater than 100% of her Max HP, her CRIT Rate will increase by 10% for 15s whenever her Bond of Life value increases or decreases. Max 2 stacks. Each stack is counted independently.
Additionally, Hunter’s Vigil’s Night Vigil state is buffed: While it is active, the percent of healing converted to Bond of Life increases to 100%.
Clorinde’s A4 Passive provides a ramping CRIT Rate buff after her BoL increases or decreases while it is above 100%. In practice, she will gain the first stack when she consumes BoL prior to dealing damage with her first Skill lunge, and the second stack when she consumes BoL prior to dealing damage with her second Skill lunge. The stacks will then be maintained at full until the end of the encounter as long as you rotate properly through your team and back to Clorinde.
Constellations
 Constellation 1 | “From This Day, I Pass the Candle’s Shadow-Veil”
Constellation Description
While Hunter’s Vigil’s Night Vigil state is active, when Electro DMG from Clorinde’s Normal Attacks hit opponents, they will trigger 2 coordinated attacks from a Nightvigil Shade summoned near the hit opponent, each dealing 30% of Clorinde’s ATK as Electro DMG.
This effect can occur once every 1.2s. DMG dealt this way is considered Normal Attack DMG.
Clorinde’s C1 creates a “Shade” triggered upon dealing Normal Attack damage while in the Night Vigil state, which performs two coordinated attacks. Based on the timings of Clorinde’s ideal Skill combos, she usually generates 5 Shades per Skill combo, for a total of 10 extra damage instances (with Clorinde’s C6, an extra set can be generated consistently). These Shades have a special ICD of 1s, shared with her C6 Shades.
 Constellation 2 | “Now, As We Face the Perils of the Long Night”
Constellation Description
Enhance the Passive Talent “Dark-Shattering Flame”: After a nearby party member triggers an Electro-related reaction against an opponent, Electro DMG dealt by Clorinde’s Normal Attacks and Last Lightfall will be increased by 30% of Clorinde’s ATK for 15s. Max 3 stacks. Each stack is counted independently. When you have 3 stacks, Clorinde’s interruption resistance will be increased. The Maximum DMG increase achievable this way for the above attacks is 2,700.
You must first unlock the Passive Talent “Dark-Shattering Flame.”
Clorinde’s C2 increases the value of her A1 by 50%. It also gives her 0.3 interruption resistance when at max stacks, which is equivalent to her being protected by Xingqiu’s Rain Swords.
C2 is a good stopping point if looking to vertically invest early into Clorinde. Her Constellations beyond this point are mainly intermediary steps towards her extremely powerful C6.
 Constellation 3 | “I Pledge to Remember the Oath of Daylight”
Constellation Description
Increases the Level of Hunter’s Vigil by 3.
Maximum upgrade level is 15.
Clorinde’s C3 increases her Skill Talent level by 3. As Clorinde’s Talent damage from her Skill is less than half of her total damage output, it only provides a relatively small overall damage increase.
 Constellation 4 | “To Enshrine Tears, Life, and Love”
Constellation Description
When Last Lightfall deals DMG to opponent(s), DMG dealt is increased based on Clorinde’s Bond of Life percentage. Every 1% of her current Bond of Life will increase Last Lightfall DMG by 2%. The maximum Last Lightfall DMG increase achievable this way is 200%.
Clorinde’s C4 adds up to 200% DMG to her Burst, depending on her current Bond of Life. This translates into a ~50% damage increase to her Burst. As the Bond of Life provided by her Burst contributes to this bonus, she should always benefit from the maximum amount.
 Constellation 5 | “Holding Dawn’s Coming as My Votive”
Constellation Description
Increases the Level of Last Lightfall by 3.
Maximum upgrade level is 15.
Clorinde’s C5 increases her Burst Talent level by 3. As with the case of her C3, it only provides a relatively small overall damage increase.
 Constellation 6 | “And So Shall I Never Despair”
Constellation Description
For 12s after Hunter’s Vigil is used, Clorinde’s CRIT Rate will be increased by 10%, and her CRIT DMG by 70%.
Additionally, while Night Vigil is active, a Glimbright Shade will appear under specific circumstances, executing an attack that deals 200% of Clorinde’s ATK as Electro DMG. DMG dealt this way is considered Normal Attack DMG.
The Glimbright Shade will appear under the following circumstances:
- When Clorinde is about to be hit by an attack.
- When Clorinde uses Impale the Night: Pact.
1 Glimbright Shade can be summoned in the aforementioned ways every 1s. 6 Shades can be summoned per single Night Vigil duration.In addition, while Night Vigil is active, the DMG Clorinde receives is decreased by 80% and her interruption resistance is increased. This effect will disappear after the Night Vigil state ends or 1s after she summons 6 Glimbright Shades.
Clorinde’s C6 offers an impressive combination of offensive and defensive bonuses. By activating her Skill, she gains:
- The ability to spawn up to six Shades once every 1s by either taking damage or using an empowered Skill lunge
- 10% CRIT Rate and 70% CRIT DMG for 12s
- Immunity to interruption and 80% damage reduction until all Shades are used.
Main Mechanic and Skill Combo
Combo Notation
- N = Normal Attack
- E = Elemental Skill
- [ ] = repeat these actions the specified number of times
Clorinde’s initial Skill use converts her Normal Attacks and Skill actions into Electro-based pistolet shots and sword lunges, respectively. Her main gameplay mechanic revolves around alternating between those two abilities depending on her current Bond of Life:
- If Bond of Life is less than 100%, use her Normal Attack. At this BoL level, her Normal Attacks pierce, deal increased damage, and generate 35% BoL.
- If Bond of Life is at or above 100%, use her Skill. At this BoL level, her Skill deals increased damage and converts the BoL into healing.
Clorinde’s basic combo is thus to activate Normal Attack three times, then use her Skill until her special Skill state ends, as follows:
- Starting at 0% Bond of Life:
- E to activate her special Skill state, then N3E until her special Skill state ends.
- The average player can execute E 6[N3E] at 60fps on PC, but a final N1 is possible.
- Starting at or above 100% Bond of Life:
- E to activate her special Skill state, followed by E then N3E until her special Skill state ends.
- The average player can execute EE 5[N3E] N3 at 60fps on PC. but a final E is possible.
Artifacts
ER Requirements
| Scenario | Burst Every Skill Combo | Burst Every Other Skill Combo |
| Solo Electro | 200%+ | 110–130% |
| Double Electro | 120–140% | 100% |
Favonius weapons reduce Clorinde’s ER needs by approximately 10% per proc.
Use the Energy Recharge Calculator to determine exact requirements for your team and rotation. For more details on how Favonius weapons will affect your team, please use Ac1d’s Favonius Mastersheet.
Artifact Stats
 Sands |  Goblet |  Circlet |
| ATK% / (EM)¹ | Electro DMG Bonus | CRIT Rate / CRIT DMG² |
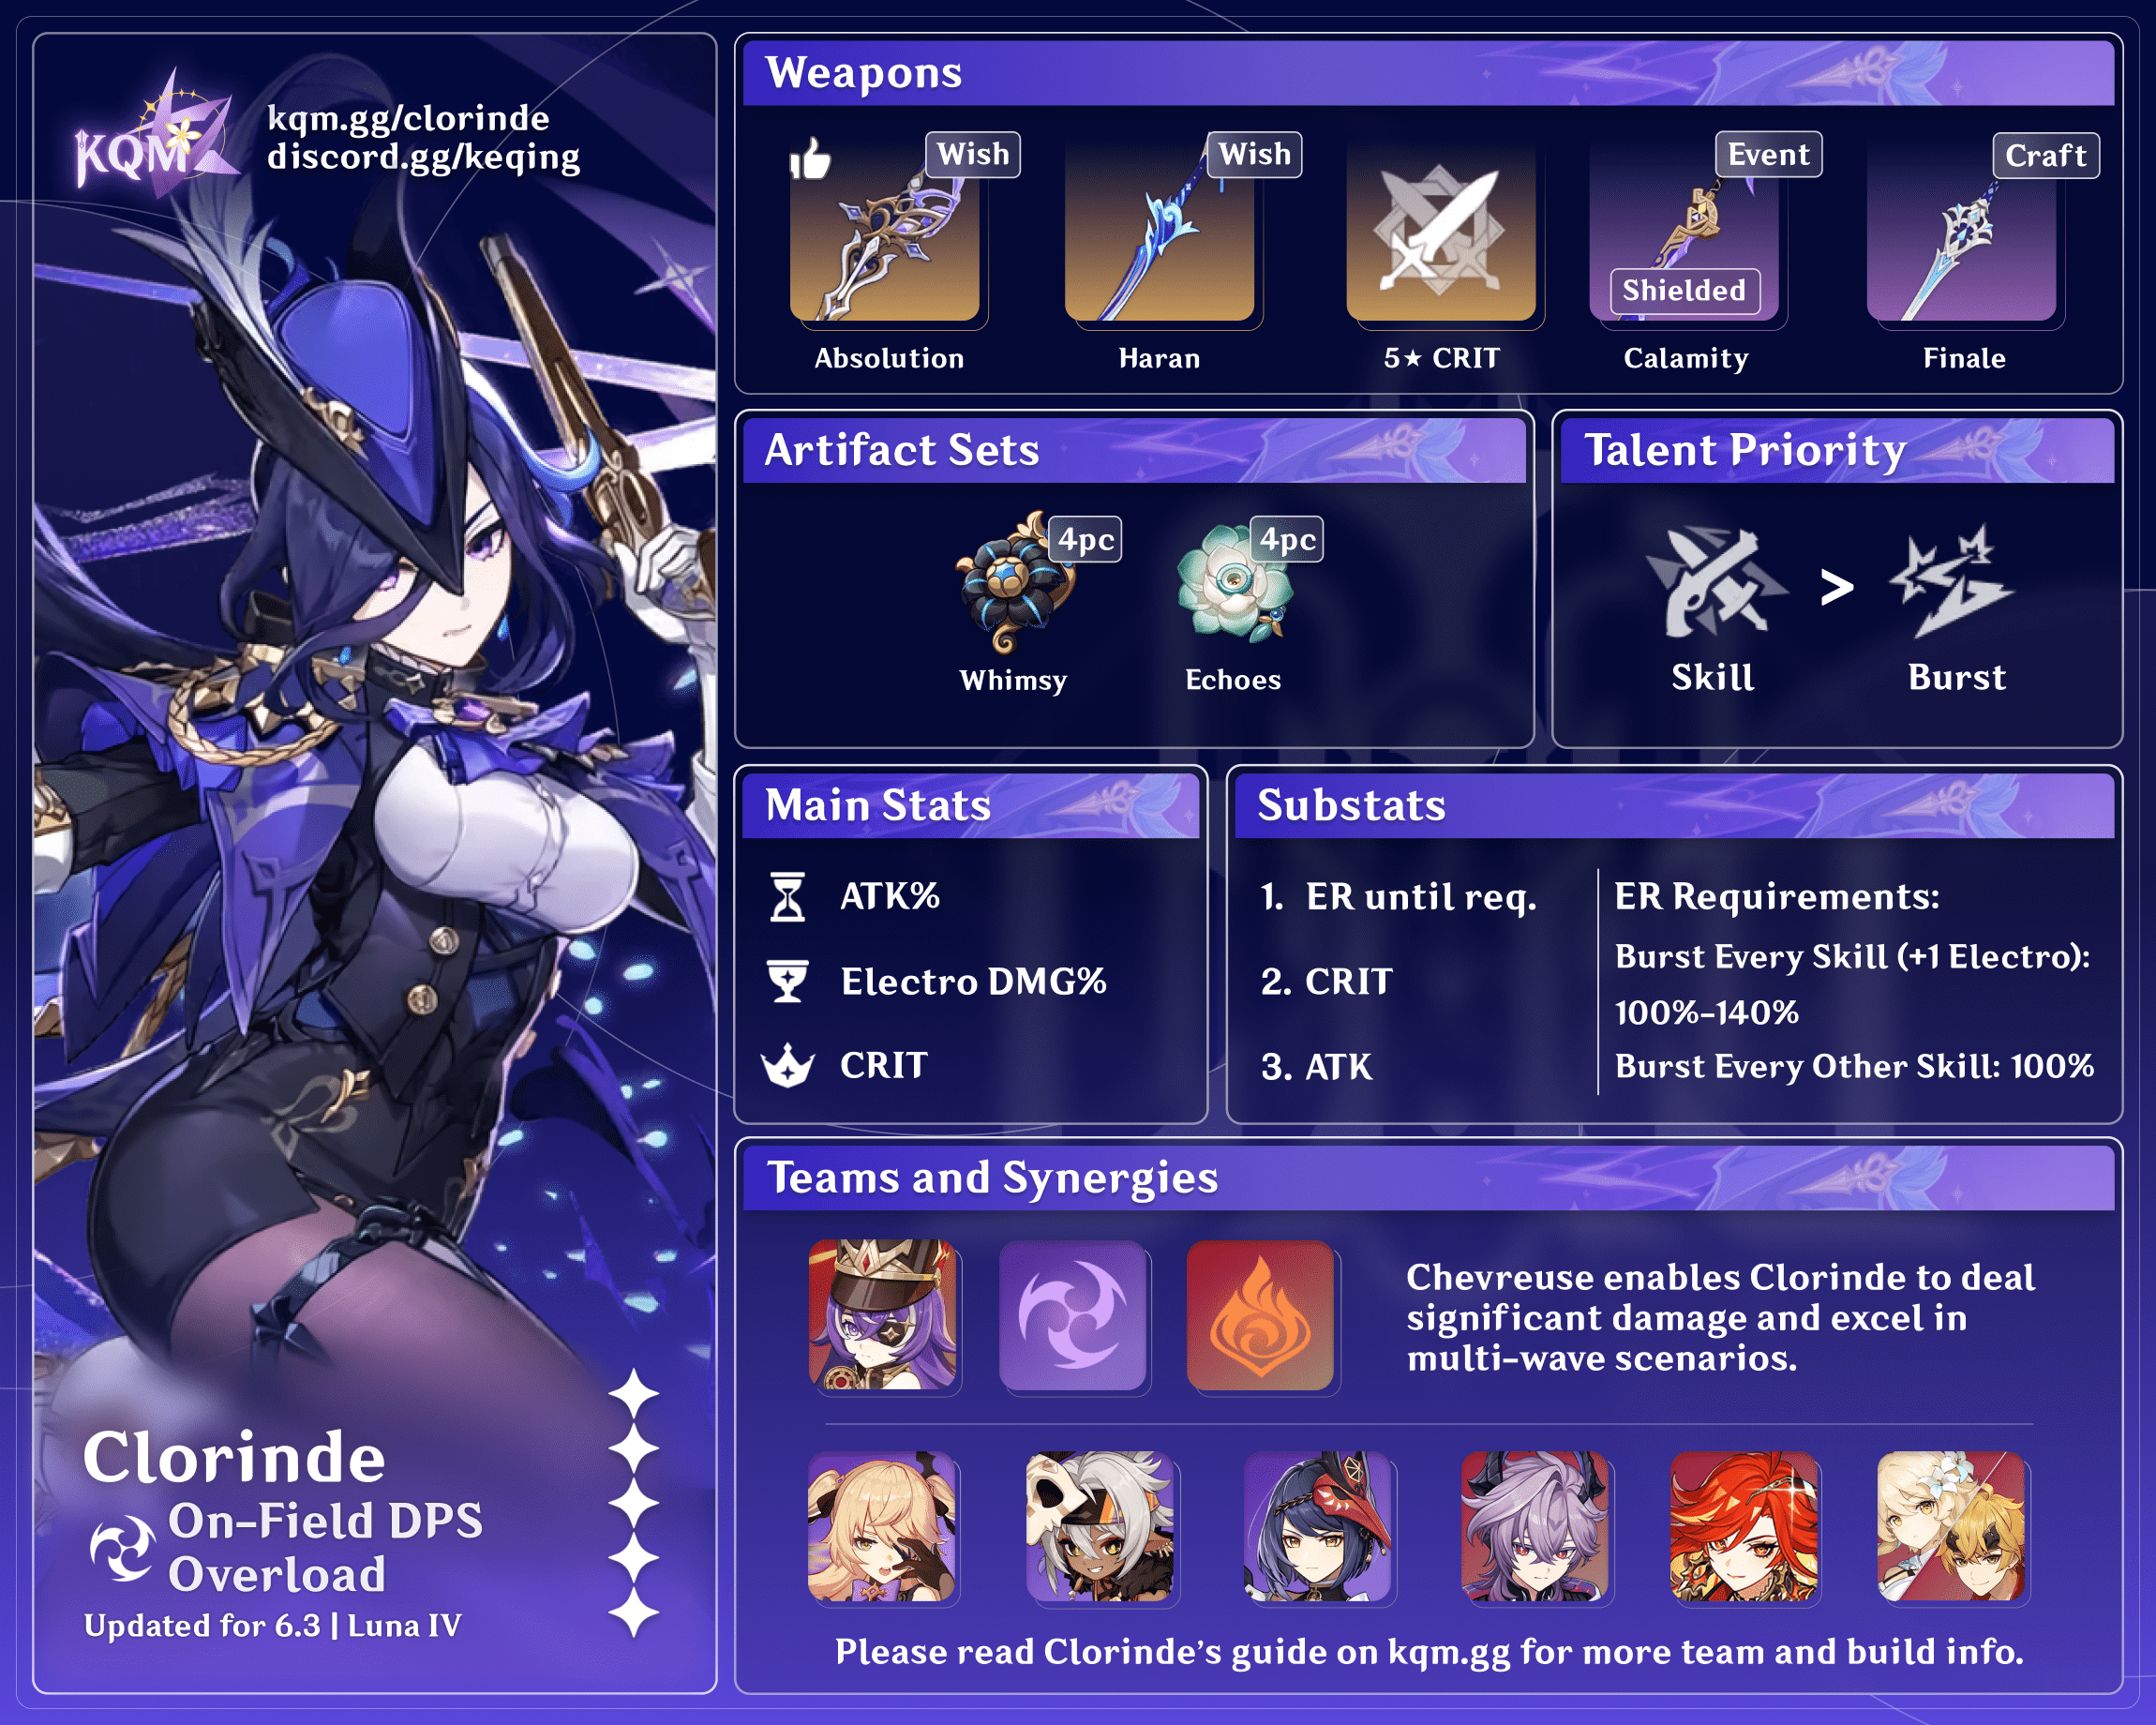
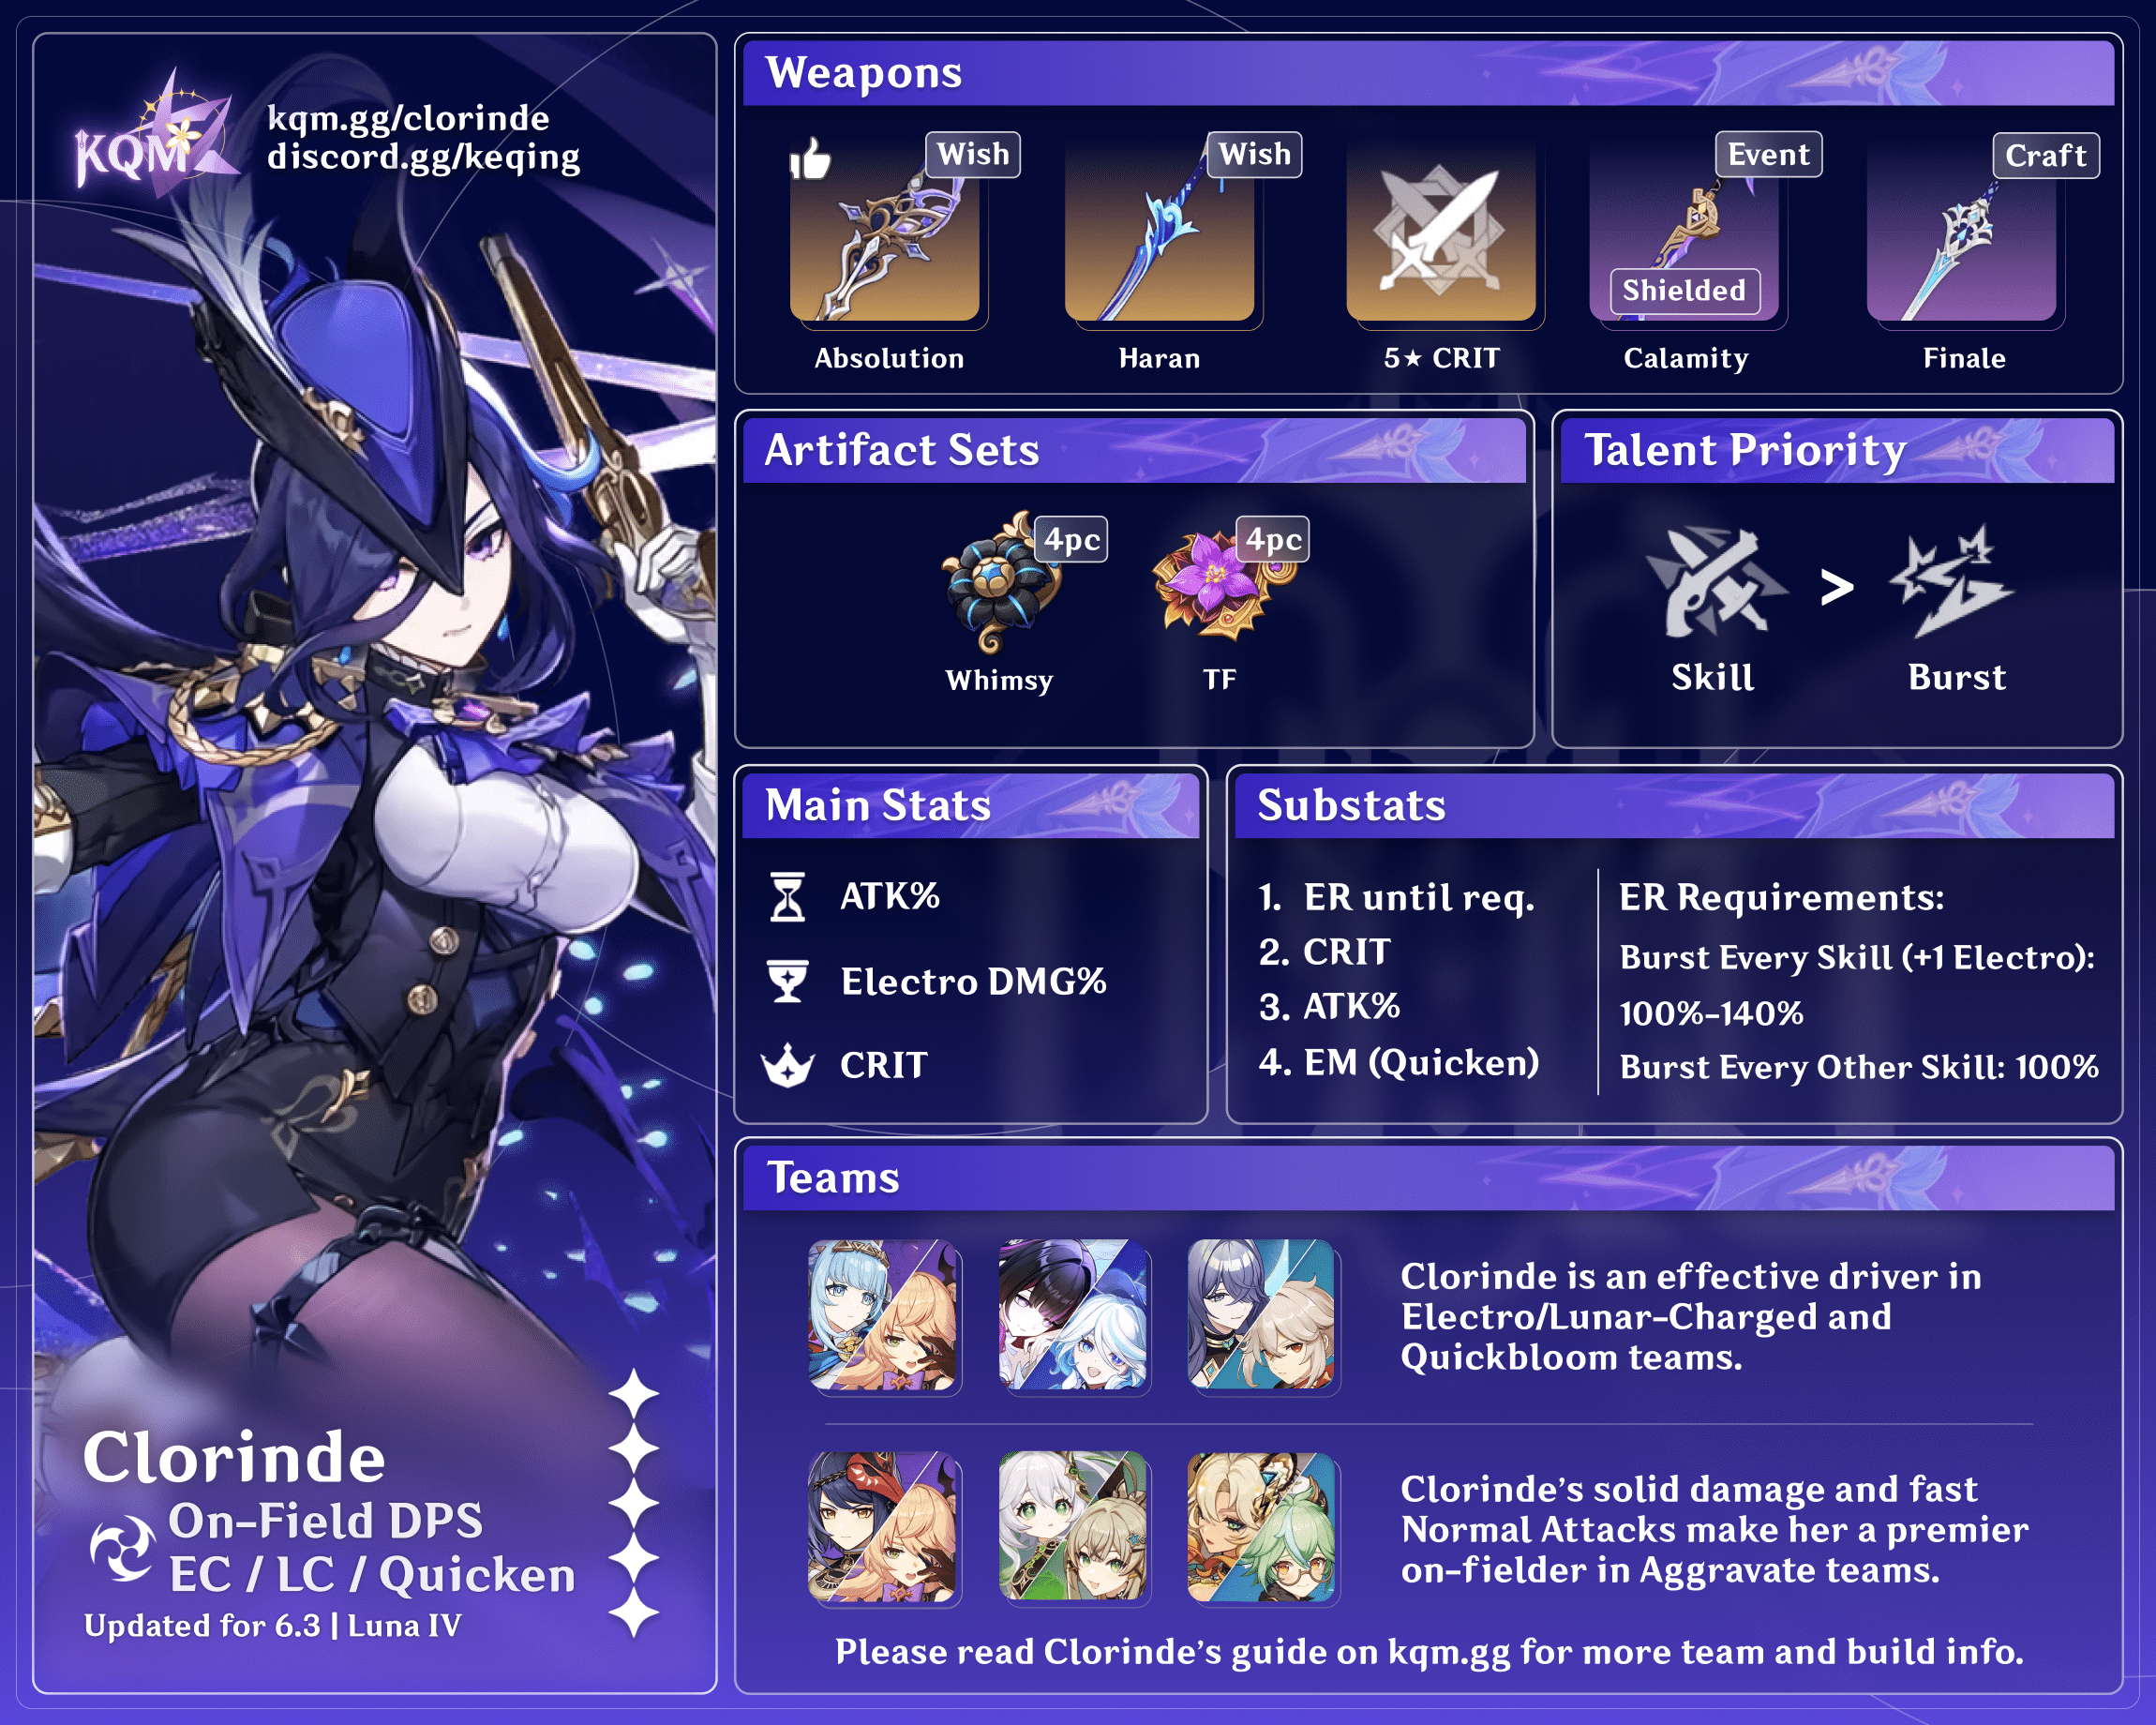
Stat Priority: ER (until requirement) > CRIT >> ATK% >> (EM)³ ≥ Flat ATK
¹When played in Quickbloom and Quickburn, ATK% and EM Sands are substat-dependent prior to C2. If C2+, ATK% Sands is favored.
²As Clorinde ascends with CRIT Rate and gains additional CRIT Rate through her A4 Passive, a CRIT DMG Circlet will be generally favored. Overall, CRIT Rate and CRIT DMG are Clorinde’s highest value stats in all team archetypes.
³While EM is not a “dead stat” in Aggravate and Electro-Charged, it is less valuable than ATK%, but has moderate value in Quickbloom as Clorinde tends to be the Hyperbloom reaction trigger. In Quickburn teams, EM can sometimes be slightly better than ATK% as Clorinde triggers frequent Overloads. It is “dead stat” in Overload, however, as Clorinde’s Electro application is too high for her to be a reaction trigger there.
Using Genshin Optimizer is a recommended way to compare your actual artifacts.
Artifact Sets
 4pc Fragment of Harmonic Whimsy | The most versatile and consistent set for Clorinde. It provides her with the highest personal damage in all her teams, as she easily stacks the 4pc effect. |
 4pc Thundering Fury | This set allows Clorinde to be used in ~25s rotations in Quicken-based teams, which is especially useful for maximizing Oz uptime (nearly 100%), as opposed to ~16s rotations where Oz uptime is only around 75%. When playing Clorinde in Co-Op or with 0 to 1 other teammates, this set can be used for higher Skill uptime, provided she can trigger reactions (e.g. against enemies with an innate aura or with a teammate that applies Hydro or Dendro). |
 4pc Echoes of an Offering | This set is a surprisingly strong option. Clorinde can make strong use of the 4pc effect and it can come out equal to or ahead of 4pc Whimsy in Overload teams. |
 4pc Gladiator’s Finale | As the majority of Clorinde’s damage is coded as Normal Attack damage, the 4pc effect provides a sizable damage gain over other 4pc sets or 2pc mixed sets, but it pales in comparison to the sets mentioned above. |
 Other 4pc Sets / 2pc Mixed Sets | Other 4pc sets and 2pc mixed sets are generally not recommended, but can be useful as a short-term temporary option. |
Weapons
 5★ Absolution | Clorinde’s signature weapon and Best-in-Slot, buffing all of her damage. |
 5★ Haran Geppaku Futsu | Most of Clorinde’s damage share (or all it, if she uses 4pc Thundering Fury) is Normal Attack damage, making this a great option, provided that you do not overcap her CRIT Rate. |
 5-Star CRIT DMG Swords | Uraku Misugiri, Mistsplitter Reforged Other 5-star CRIT DMG Swords are solid weapons but change in relative value depending on the team. |
 4★ The Black Sword | A strong 4-star option, especially in teams where ATK buffs are plentiful, such as when Clorinde is paired with Sara, Iansan, or Bennett. |
 4★ Finale of the Deep | As a craftable weapon, Finale of the Deep is generally Clorinde’s strongest free-to-play weapon, as it perfectly synergizes with her kit and field time. |
 4★ Calamity of Eshu (Shielded) | This weapon has a very strong passive effect, but only when Clorinde is protected by a shield, such as from Thoma, Kirara, Lan Yan, or Crystallize. |
 3★ Harbinger of Dawn (Passive Active) | A strong 3-star option if you are able to maintain its passive in teams where ATK buffs are plentiful, such as when Clorinde is paired with Sara, Iansan, or Bennett. |
Teams
Rotation Notation
- N = Normal Attack
- C = Charged Attack
- A = Aimed Shot
- P = Plunging Attack
- E = Elemental Skill
- tE = Tap Skill
- hE = Hold Skill
- Q = Elemental Burst
- D = dash (cancel)
- J = jump (cancel)
- W = walk (cancel)
- > = switch character
- ( ) = these actions are optional; please refer to the notes below
- [ ] = repeat these actions the specified number of times
Teambuilding
- Clorinde synergizes best with teammates that provide her or the team with powerful offensive support (e.g. Kazuha or Chevreuse) or meaningful personal damage (e.g. Fischl or Mavuika), without causing delays in activating Clorinde’s Skill. As such, her strongest teams tend to favor 16s rotations (or 25s if using 4pc Thundering Fury in Quicken-based teams).
- In most, if not all, teams, Clorinde needs an Electro teammate to apply Electro for her prior to taking the field since she has no easy means of doing it herself. This is for several reasons. First, it allows her teammates to fully stack her A1 Passive before she takes the field. Second, it permits key rotation setups without needing to use her (unbuffed) Burst. Third, it helps generate additional Energy particles for Clorinde via Electro Resonance.
Notable Teammates
Pyro
Pyro teammates are predominantly used as part of Overload teams with Chevreuse, serving a variety of functions depending on their kit.
 Chevreuse | Chevreuse is the key to unlocking Clorinde’s Overload teams. Her A1 Passive reduces an enemy’s Electro and Pyro RES by 40% for 6s when affected by the Overload reaction, without her even needing to take the field. This is especially helpful in multi-wave scenarios when paired with an off-field Pyro applier. Additionally, her A4 Passive provides a solid buff of up to 40% ATK to Electro and Pyro units, based on her Max HP, when using her Skill anytime after an Overload reaction occurs. Chevreuse generally builds towards maximizing her HP. As she does not necessarily need to use her Burst every rotation unless wearing the 4pc Noblesse Oblige set, this helps mitigate some of her ER requirements. |
Mavuika | Mavuika is an excellent damage dealer / buffer for Clorinde in her Overload and Quickburn teams. Her consistent off-field Pyro application every 2s from her Skill easily sustains Chevreuse’s A1 Passive or Burning aura. Being from Natlan, she can utilize the full effect of Scroll’s 4pc set bonus if a better user is not available. It is important to note that while Mavuika’s Burst deals a decent amount of damage and activates her on-field DMG% buff via her A4 Passive, using her Burst every rotation is not usually beneficial from a team DPS perspective if she is wearing 4pc Scroll. Because her Burst has an 18s cooldown, she does not currently receive enough team buffs to compensate for extending the rotation by 2s. This applies even if Mavuika can reach 200 Fighting Spirit in a single rotation. However, when teamed with Ororon or Iansan, she can wear 4pc Obsidian Codex, and an 18s rotation becomes preferred, with Mavuika performing 2–4 empowered Charged Attacks after using her Burst to fill rotation time. |
Xiangling | Similar to Mavuika (but with less buffing capability), Xiangling works well as an enabler of Chevreuse’s A1 Passive and Burning aura via off-field Pyro application from her Burst and Skill. It is best to build her either full EM or EM-leaning, as she contributes a fair amount of damage through the Overload reaction. |
 Bennett | Bennett’s Burst provides a substantial Flat ATK buff to Clorinde and other teammates who deal damage on-field, and his buff can be snapshot by teammates such as Fischl and Xiangling. The primary focus should be on building enough ER to ensure his Burst is ready for every rotation. |
Thoma | Thoma is a defensive option that can provide shielding and interruption resistance for Clorinde. The consistency of his Pyro application makes him very useful against mobile enemies. The primary focus should be on building sufficient ER to Burst every rotation, following which you can gear towards buffing his shield (HP) or increasing his Overload reaction damage (EM). |
 Pyro Traveler | Pyro Traveler, while not a true Natlan character, has a Nightsoul’s Blessing state, which means they are able to utilize the full effect of Scroll’s 4pc set bonus. Their Skill applies off-field Pyro every 3s, which easily sustains Chevreuse’s A1 Passive. The only downside is their 18s cooldowns, which somewhat limits their overall effectiveness as it lowers Clorinde’s field time. Since the majority of their personal damage will be from the Overload reaction, Pyro Traveler should build full EM once their ER requirements are met. |
Electro
Electro teammates assist Clorinde in applying Electro and stacking her A1 Passive before she takes the field, and they generate Electro particles to help recharge her Elemental Burst.
 Fischl | Fischl’s personal damage contribution, off-field Electro application, and high particle generation make her an excellent teammate for Clorinde. In Quicken-based teams, EM becomes strongly favored due to her high reaction counts; in other team archetypes, EM is far less valuable. |
 Sara | Sara is a potent buffer at C6, making her an excellent choice for boosting Clorinde’s personal damage, as well as other teammates’. In a team with Clorinde, it is often disadvantageous to self-buff Sara, as it takes rotation time away from Clorinde. The focus should be on building enough ER to ensure her Burst is up every other rotation (or every Spiral Abyss chamber), then investing into her personal damage. |
Ororon | Ororon is an off-field damage dealer whose damage output is fueled by his teammates either dealing Nightsoul-aligned damage or triggering Electro-Charged. Being from Natlan, he can utilize the full effect of Scroll’s 4pc set bonus in Clorinde’s Electro-Charged teams or Overload teams with Mavuika or Pyro Traveler. |
Iansan | Iansan, through her Burst, provides the active team member with a potent ATK buff, as long as they can sustain her Nightsoul bar with constant high movement. While Clorinde moves often during her Skill combo, it is not enough to sustain Iansan’s movement requirement without Mavuika or Iansan’s C4. Being from Natlan, she can utilize the full effect of Scroll’s 4pc set bonus. Because Iansan’s cooldowns are 18s, she works best with Clorinde in Overload teams that have other teammates with similar cooldowns, like Mavuika or Thoma or Pyro Traveler. Mavuika in particular synergizes greatly with Iansan and covers Clorinde’s shortcomings in maximizing Iansan’s buffs alone. |
Yae Miko | Yae Miko doesn’t quite fill the role of Fischl in Quicken teams, as her damage doesn’t make up for field-time requirements. However, she is an adequate stand-in if a C6 4-star Electro teammate is unavailable, especially in Overload teams. She does not need to build any ER as her Burst is either not used or used whenever available when paired with Clorinde. |
Hydro
Hydro teammates are mainly used as a source Hydro application to pair with Nahida in Quickbloom teams and Electro-Charged teams.
 Furina | Furina’s offensive buffing capabilities and decent personal damage make her a potent partner for Clorinde in Quickbloom and Electro-Charged teams. In addition, while her Burst is active, she improves Clorinde’s self-healing when she consumes Bond of Life via her Skill. Furina can usually forgo substantial ER investment in Clorinde’s teams, as her Skill duration is long enough to cover two Clorinde Skill combos, and Fanfare generation is not fast enough to make using her Burst every 16s worthwhile. |
 Yelan | On the surface, Yelan seems like a good match for Clorinde, but the 1s interval on her Burst does not sync perfectly with Clorinde’s attack pattern. The ramping damage buff that she provides is appreciated and her measured Hydro application makes her an adequate replacement for Furina in Quickbloom teams. |
Dendro
Dendro teammates enable the Quicken and Hyperbloom reactions and generally provide minor support buffs.
Nahida | Nahida is the premier offensive option for Clorinde’s Quicken teams, even when she is relegated to a supportive role. In addition, the strength of her Dendro application is necessary in order to maintain sufficient Quicken uptime in Quickbloom teams. Generally, Nahida should build full EM if using Wandering Evenstar or when played in Quickbloom; otherwise, she can build for her personal damage, even if wearing a support set. |
Kirara | Kirara is a very strong alternative to Nahida, and often as good or better in practice in Aggravate teams, thanks to her shield providing much-appreciated interruption resistance to Clorinde. It is recommended to build HP to increase her Shield Strength until comfortable, at which point you can focus on offensive stats for extra chip damage. It can also be useful to build ER on her to have her Burst available more frequently if AoE Dendro application is needed. |
 Emilie | Emilie works very well with Clorinde in Quickburn teams. Her Dendro application is enough to sustain Quicken aura as Electro also reacts with Pyro throughout the rotation. Emilie should focus on maximizing her personal damage and can forgo building ER as she either uses her Burst every other rotation or not at all. |
 Collei | Collei’s low field time and decent Dendro application synergize well with Clorinde rotationally, but she generally provides less team damage contribution compared to Nahida or Kirara. |
 Yaoyao | Yaoyao’s 15s Skill cooldown and constant Dendro application synergize well with Clorinde, but she generally provides less team damage contribution compared to Nahida or Kirara. |
Anemo
Anemo teammates generally serve as offensive supports via team buffing or enemy debuffing. All of them hold 4pc Viridescent Venerer.
Kaedehara Kazuha | Kazuha’s offensive support via a DMG% buff from his A4 Passive, enemy grouping and stagger capabilities, and decent personal damage in multi-target scenarios make him a phenomenal support for Clorinde, and generally Clorinde’s best Anemo teammate. Kazuha does not need to build much ER since he only needs to Burst every other Clorinde Skill combo, letting him focus on building EM to improve his A4 buff. |
 Sucrose | Sucrose is a very effective offensive support for Clorinde in Aggravate, especially in single-target scenarios, thanks to her team-wide EM and DMG% buffs. Sucrose only needs to build ER at C6, and only enough to allow her to Burst every other Clorinde Skill combo, letting her focus on building EM to improve her A4 buff. |
Lan Yan | Lan Yan provides a strong shield from her Skill and can wield a supportive Catalyst. She can be built fully for either her ATK-scaling shield or damage without worrying about ER as her Burst is not needed rotationally. |
 Lynette | Lynette can fill in as a VV support, providing a taunt and some ATK% from her A1, but her buffing capabilities do not match the level of Kazuha or Sucrose. In a team with Clorinde, once she has enough ER to Burst at least once every other Clorinde Skill combo, she can be built for her personal damage. |
Geo
Geo teammates generally provide a mix of offensive and defensive support.
Xilonen | Xilonen is a powerful offensive support that reduces enemy Elemental RES based on the distribution of Pyro / Hydro / Electro / Cryo team members, with practically permanent uptime. In addition, Xilonen potentially enables other support teammates (such as Nahida) to wear 4pc Archaic Petra for extra buffing. Xilonen often does not have any particular stat goals, although DEF should be a focus to improve her healing or to meet the cap on her signature weapon. |
 Chiori | Chiori acts as an off-field damage dealer and reaction trigger for Clorinde’s A1 Passive in Double Geo teams. She is best when added to teams that already include a Geo unit. Chiori can focus on maximizing her personal damage and can forgo building ER as she uses her Burst every other rotation. |
 Yun Jin | Yun Jin serves as a strong buffer in Double Geo teams for Clorinde, as the Additive Base DMG Bonus from her Burst fits well with Clorinde’s kit. Yun Jin should be built to first satisfy her ER requirements, then into DEF to increase her buff strength. |
Example Teams
All sample teams assume C6 4-star units. 5-star units are C0 unless otherwise stated. 4-star unit Constellations that are impactful rotationally are explicitly noted with alternative approaches. This is not a comprehensive list of teams. The inclusion or exclusion of any given team does not necessarily reflect its power level.
Quicken

While Clorinde predominantly excels in Aggravate teams with a debuffer such as Kazuha or Xilonen, a Hydro unit such as Furina can be slotted in to enable “Quickbloom” (Aggravate + Hyperbloom) or a Pyro unit such as Xiangling can be slotted in to enable “Quickburn” (Aggravate + Overload + Burning).
Example Aggravate Teams

Sample Rotation
Opener: Fischl Q > Kazuha Q > Nahida E > Clorinde E Combo
Ongoing Rotation: Kazuha tEP > Clorinde Q> Nahida E (Q) > Fischl E/Q > Kazuha N1 Q / tEP > Clorinde E Combo

Sample Rotation
Opener: Sara E C > Xilonen E N2 > Nahida E > Sara Q > Clorinde E Combo
Ongoing Rotation: Sara E > Clorinde Q > Xilonen E N2 > Nahida E > Sara C > Clorinde E Combo > Xilonen EQ N2 > Nahida E Q C > Sara Q > Clorinde E Combo

Sample Rotation (4pc Thundering Fury)
Opener: Fischl Q > Kirara shE > Sucrose EQ > Clorinde E Combo
Ongoing Rotation: Kirara shE > Fischl E > Sucrose E > Clorinde E Combo > Sucrose N2C > Fischl Q > Kirara shE > Sucrose EQ > Clorinde E Combo
Example Quickbloom Teams

Sample Rotation (Furina)
Nahida E > Furina ED Q > Fischl Q > Clorinde E Combo Q > Nahida N2 E Q > Fischl E > Clorinde E Combo Q
Sample Rotation (Furina – 4pc Thundering Fury)
Nahida E Q > Furina ED Q > Fischl E > Clorinde E Combo > Nahida E N1C > Fischl Q > Clorinde E Combo
Sample Rotation (Yelan – 4pc Thundering Fury)
Nahida E Q > Fischl E > Yelan EQ N1 > Clorinde E Combo > Fischl Q > Yelan E > Clorinde E Combo
Example Quickburn Teams

Sample Rotation (Mavuika)
Emilie E/Q > Mavuika tE (Q) > Fischl E/Q > Clorinde E Combo Q
Sample Rotation (Xiangling – 4pc Thundering Fury)
Emilie E > Xiangling Q ED > Fischl E > Clorinde E Combo Q > Xiangling N2 ED > Fischl Q > Clorinde E Combo
Overload

Overload teams, predominantly enabled by Chevreuse’s A1 Passive, focus on maximizing Clorinde’s damage output through a mix of offensive buffs and debuffs.
Example Teams

Sample Rotation (Mavuika)
Opener: Sara E > Mavuika N1 tE > Chevreuse Q hE > Mavuika Q > Sara Q > Clorinde E Combo
Ongoing Rotation: Sara C > Clorinde Q > Chevreuse¹ hE N1 > Mavuika tE (Q) > Sara E(Q) > Clorinde E Combo
¹If Chevreuse is C4+ and your ping allows, you can perform Sara C > Chevreuse hE N1 > Clorinde Q instead. This will funnel Sara’s, Cheveruse’s and Fav particles to Clorinde and substantially reduce her ER requirements.
Sample Rotation (Pyro Traveler)
Opener: Sara E > Chevreuse Q hE > Pyro Traveler tE¹ Q > Sara Q > Clorinde E Combo
Ongoing Rotation: Sara C > Clorinde Q > Chevreuse Q 3[hE] > Pyro Traveler tE Q > Sara E(Q) > Clorinde E Combo
¹Tap Skill on Pyro Traveler allows for more frequent hits, which can apply Pyro quickly in multi-wave settings. Hold Skill can be useful against flying targets or targets that Clorinde cannot play close to.

Sample Rotation (Mavuika)
Opener: Fischl Q > Mavuika N1 tE > Chevreuse Q hE > Mavuika Q > Clorinde E Combo Q
Ongoing Rotation: Chevreuse hEQ > Fischl E/Q > Mavuika tE Q > Clorinde E Combo Q
Sample Rotation (Xiangling)
Opener: Fischl Q > Chevreuse Q hE > Xiangling Q ED > Clorinde E Combo Q
Ongoing Rotation: Chevreuse Q hE > Fischl E/Q > Xiangling N2/Q ED > Clorinde E Combo Q

Sample Rotation (Mavuika)
Opener: Ororon EQ > Chevreuse Q hE > Mavuika tE Q 4C > Clorinde E Combo
Ongoing Rotation: Chevreuse hEQ > Clorinde Q > Ororon EQ > Mavuika tE Q 4C > Clorinde E Combo
Sample Rotation (Pyro Traveler)
Opener: Ororon E > Chevreuse Q hE > Ororon Q > Pyro Traveler tE Q¹ > Clorinde E Combo Q
Ongoing Rotation: Ororon EQ > Chevreuse Q 3[hE] > Pyro Traveler tE Q > Clorinde E Combo Q
¹Tap Skill on Pyro Traveler allows for more frequent hits, which can apply Pyro quickly in multi-wave settings. Hold Skill can be useful against flying targets or targets that Clorinde cannot play close to.

Sample Rotation (Mavuika)
Mavuika tE > Iansan E (N1) Q > Chevreuse hEQ > Mavuika Q C¹ > Clorinde E Combo Q
¹If executed fast enough, you can perform an extra Charged Attack and Dash (e.g. Mav Q C2D) for more team DPS while still having Iansan’s buff up for Clorinde’s Burst.
Sample Rotation (Thoma)
Thoma EQ¹ > Iansan E N1 Q > Chevreuse Q 3[hE] > Clorinde E Combo Q
¹Do Q (N1) E if Thoma is using Kitain Cross Spear.
Electro-Charged

Electro-Charged teams are generally “raw damage” teams and the reaction itself is simply a byproduct that provides some minor extra damage.
Example Teams

Sample Rotation (Ororon)
Furina ED Q > Ororon EQ > Kazuha tEP > Clorinde E Combo > Kazuha tEP > Clorinde Q > Kazuha Q > Ororon EQ > Kazuha tEP > Clorinde E Combo
Sample Rotation (Fischl)
Furina ED Q > Fischl Q > Kazuha tEP > Clorinde E Combo > Kazuha tEP > Clorinde Q > Kazuha Q > Fischl E > Kazuha tEP > Clorinde E Combo > Kazuha tEP > Clorinde Q

Sample Rotation (Ororon)
Furina ED Q > Ororon EQ > Xilonen E N2 > Clorinde E Combo Q > Xilonen EQ N2 > Ororon EQ > Clorinde E Combo
Sample Rotation (Sara)
Sara E C > Xilonen E N2 > Furina ED Q > Sara Q > Clorinde E Combo > Sara E > Clorinde Q > Xilonen E N2 Q > Sara C > Clorinde E Combo
Credits
mikeskies, breadcatow, lostguide, plumetra
Team images made with the KQM portrait generator.