Updated for Version Luna IV

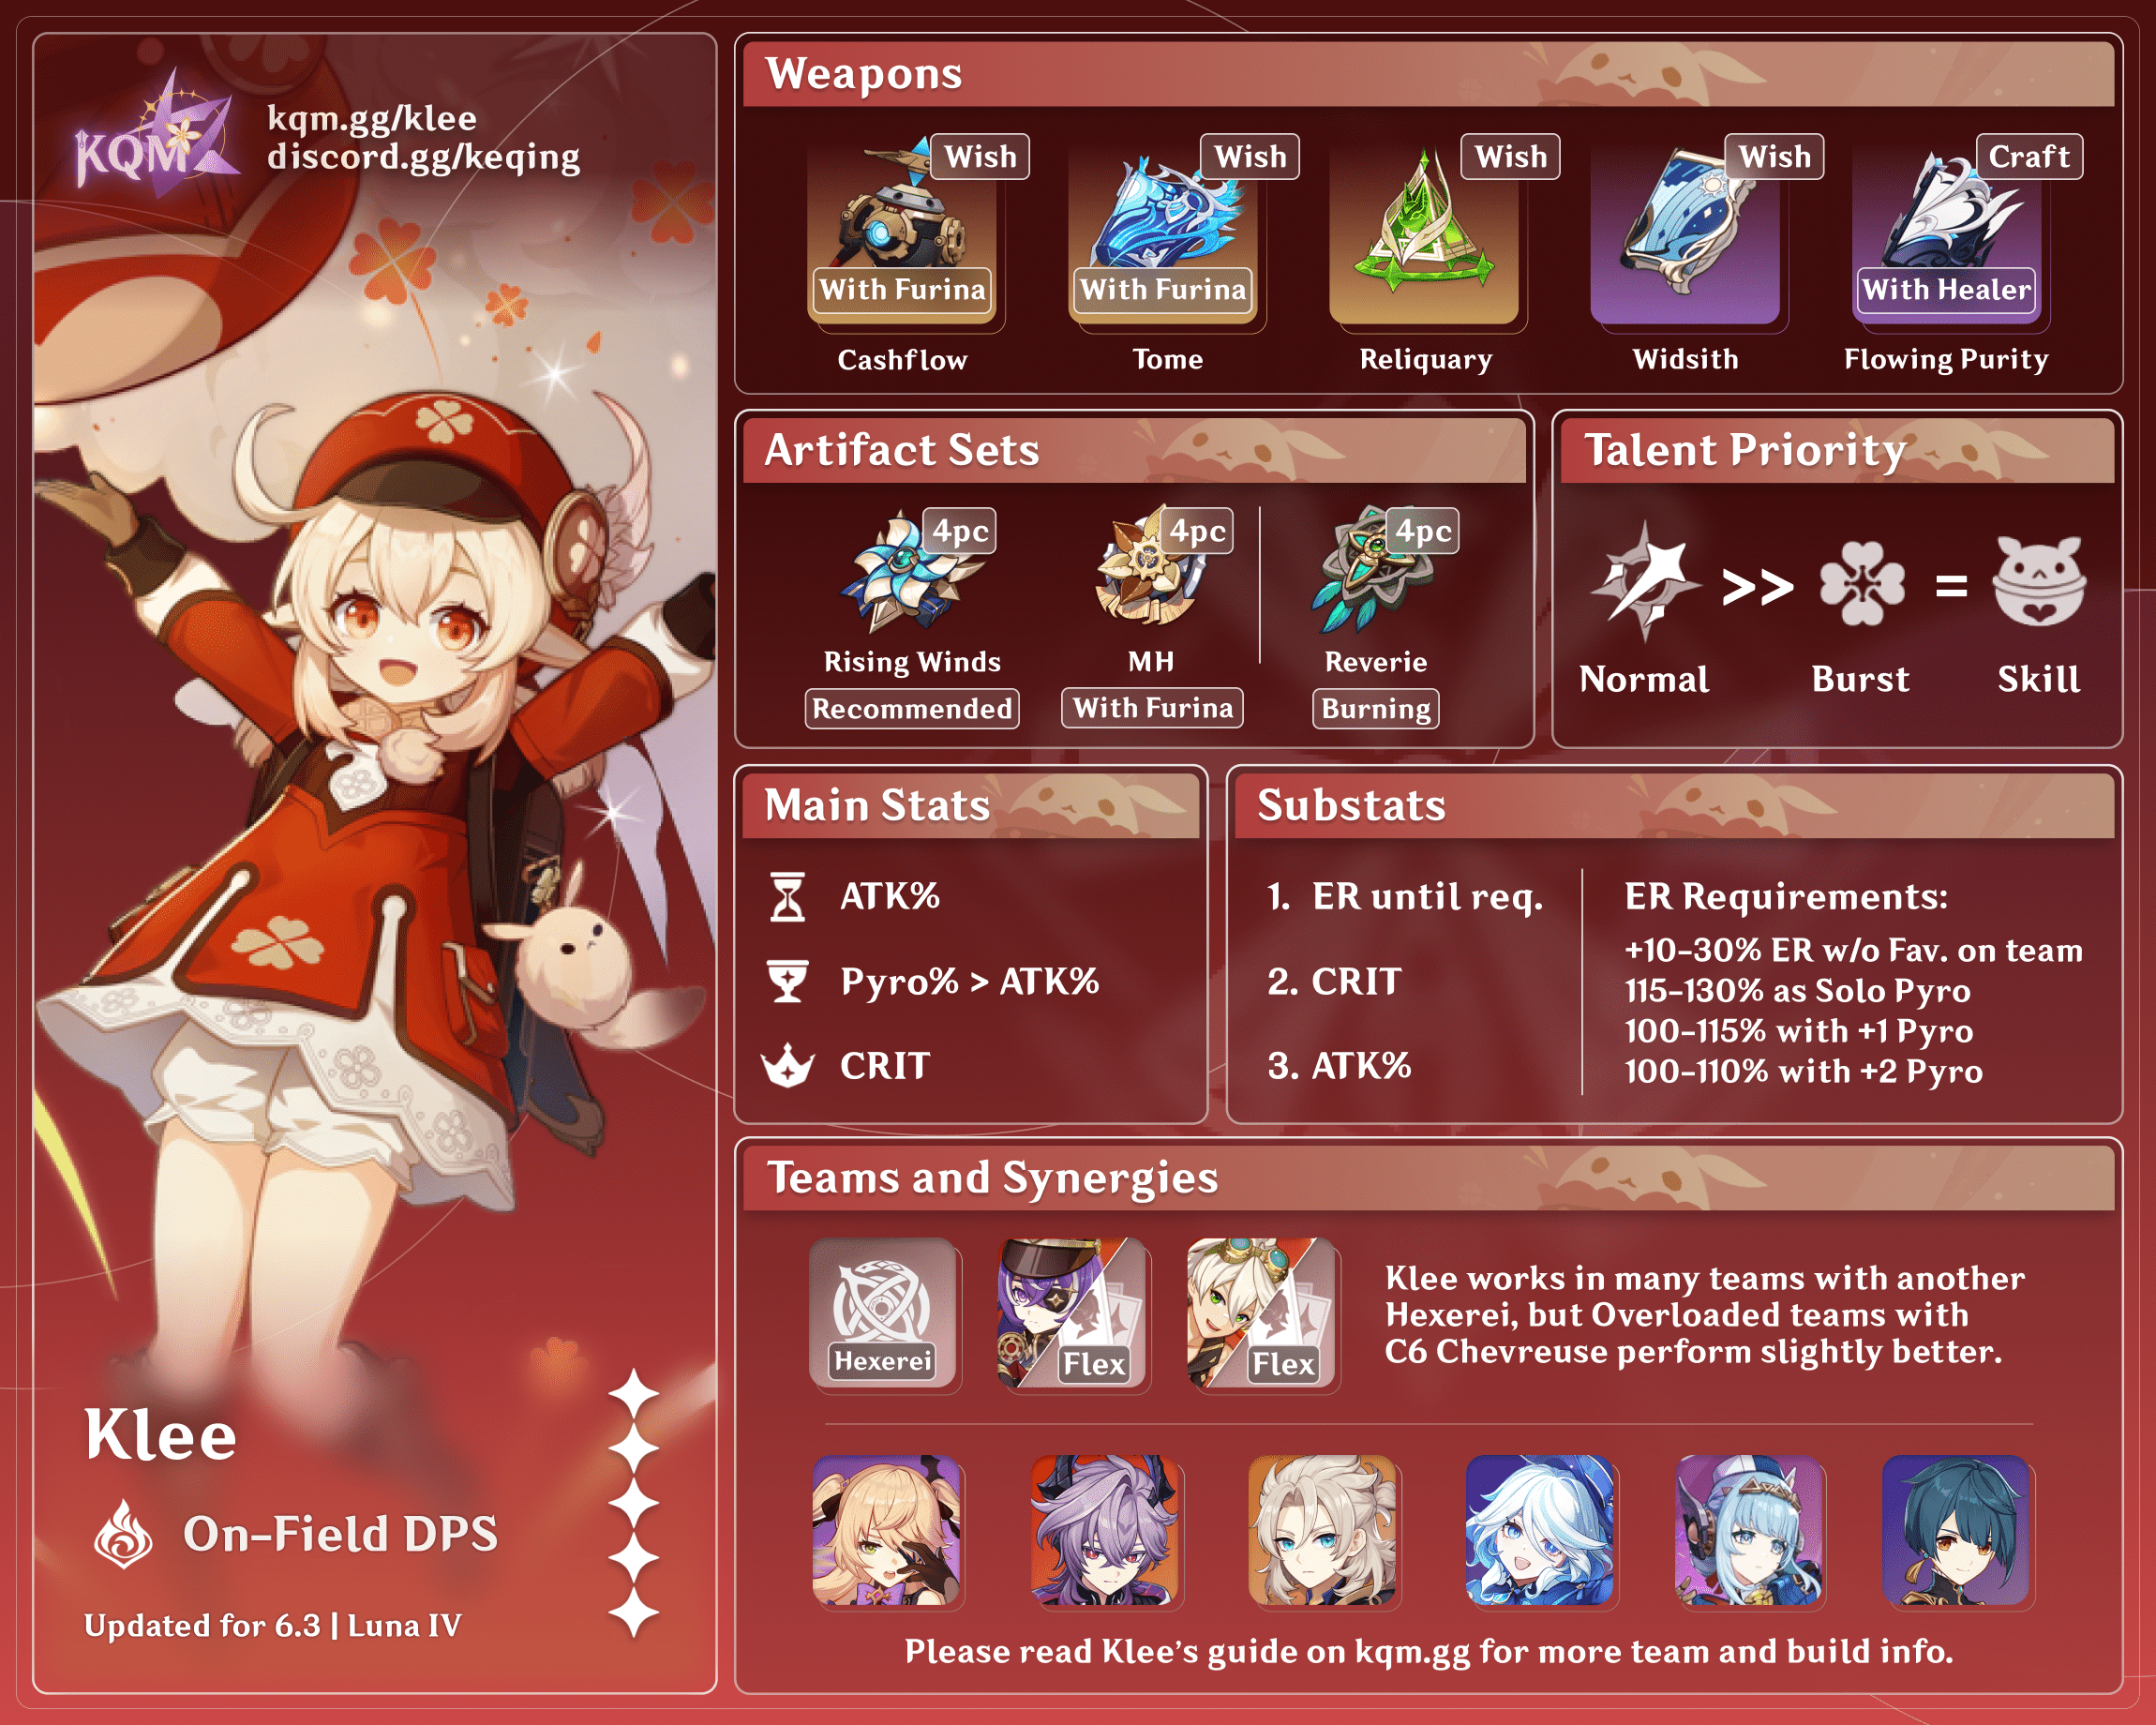
Klee is a 5★ Pyro Catalyst character in Genshin Impact whose explosive Pyro application, high hit rate, and strong damage enable high-performing teams. Learn about Klee’s best builds, best weapons, best artifacts, and best teams in this quick guide. This guide covers Klee’s kit with Hexerei buffs, which is both a massive upgrade and a key part of her gameplay. Be sure to complete her Witch’s Homework quest, as well as those of any other Hexerei characters that you use in her teams (or in general, for that matter).
Note that the information given may change if new discoveries are made. More extensive testing is in progress.
The full-length guide is available here. It contains accurate information but does not include the Hexerei buffs introduced in Version Luna III. Refer to it, however, for Klee strategies and cancels with more detailed explanations.
Join our Discord to participate in the theorycrafting process.
Table of Contents
Infographic
Credits to: angtahimik, cegewinne, auraolis, cpm2486 and KQM Staff
Character Overview
Pros
- Her high rate of Pyro application can enable other characters to react, increasing their damage potential.
- Her high poise damage makes her good against specific content.
- She provides extra Energy for her teammates with her A4 Passive.
- When paired with other Hexerei characters, Klee’s capabilities are enhanced to create a stronger Spark Knight than ever before.
- Klee’s buffed C1 has become an incredibly strong upgrade to her damage that you can obtain for free.
- At C2, Klee can play as an off-field support for other damage dealers.
- With Hexerei buffs, Klee is a much easier character to use than before.
Cons
- Her high rate of Pyro application makes it difficult for Klee to trigger reactions herself, lowering her personal damage potential in most cases.
- Klee is reliant on activating Secret Rite by teaming up with other Hexerei characters to reach her full potential.
- A combination of poise and Overload damage can end up in having to chase enemies due to them being launched, which can both waste time and leave area-specific buffs (e.g. Bennett’s Burst).
- Klee can have Energy issues in many of her teams due to her reliance on her Burst.
- Low interruption resistance can cause issues with Klee being easily knocked down.
Playstyles
On-Field DPS
Klee maximizes her damage within her Burst window by utilizing her Normal and Charged Attacks. In Hexerei teams, Klee’s Normal Attack counter does not reset, and while she possesses a Spark, she takes advantage of her third Normal Attack to produce an additional Charged Attack. As it is optimal for Klee to cancel her Skill (see the Talents and Combos sections for details), Klee generally only uses her Skill once in a rotation, typically after her third Normal Attack, as it can be used to cancel its animation. And thanks to her Ascension 4 Passive, Klee provides a considerable amount of flat Energy to her entire team when her Charged Attack is a CRIT hit. Thanks to her incredible Pyro application, Klee can be used as an enabler for teammates like Furina, a powerful DPS in Chevreuse Overload teams, or in reaction teams to boost her own damage.
Off-Field C2 Support
Although Hexerei buffs don’t change this playstyle too much, its viability is still as strong as always. Thanks to her C2’s DEF Shred and her ability to wield TTDS, Klee is a very strong support for most frontloaded DPS units (or any DPS unit that wants a Pyro debuffer). She can also be a nice alternative support when a Hexerei support is needed.
Quickswap C4+
Another support alternative if you have C4+ Klee. You can use her Burst and Normal Attack for some time to benefit a bit from Klee’s on-field potential without losing her support potential. Note that this playstyle is relatively niche.
Talents
Level and Talent Priority
Normal Attack > Lvl 90 = Skill = Burst
Although Klee uses all her Talents, most of Klee’s personal damage comes from her Normal Attacks and Charged Attacks, making leveling her Normal Attack Talent highly recommended. Leveling one of her other Talents (Skill or Burst) from Level 8 to 10 is equivalent to raising her Character Level from 80 to 90, so you can keep her at Level 80+ and her Skill and Burst Talents at Level 8 to save resources. However, they still contribute damage and are required to reach Klee’s damage ceiling, so they should all be leveled eventually.
Talent Overview
 Normal Attack | Kaboom!
Talent Description
Normal Attack
Throws things that go boom when they hit things! Performs up to 3 explosive attacks, dealing AoE Pyro DMG.
Charged Attack
Consumes a certain amount of Stamina and deals AoE Pyro DMG to opponents after a short casting time.
Plunging Attack
Gathering the power of Pyro, Klee plunges towards the ground from mid-air, damaging all opponents in her path. Deals AoE Pyro DMG upon impact with the ground.
Klee’s core talent. Like many of her Talents, her Normal Attack gets upgraded with Hexerei buffs. It is a fast three-hit sequence, with the last hit being slower. They can be used to cancel almost any animation.
Klee’s Charged Attack consumes a massive 50 Stamina if there are no Sparks left, so it is important to manage Sparks to avoid Stamina depletion.
 Elemental Skill | Jumpy Dumpty
Talent Description
Jumpy Dumpty is tons of boom-bang-fun!
When thrown, Jumpy Dumpty bounces thrice, igniting and dealing AoE Pyro DMG with every bounce.
On the third bounce, the bomb splits into many mines.
The mines will explode upon contact with opponents, or after a short period of time, dealing AoE Pyro DMG.
Starts with 2 charges.
Klee’s Skill throws a Jumpy Dumpty that bounces and deals AoE Pyro damage, finally splitting into mines. Both Kazuha and Sucrose can suck said mines. Klee’s Skill also grants one Spark on cast, but her cooldown is not triggered until her Skill is fully released, so she can get extra Sparks if you cancel her Skill using her Burst, thereby allowing you to use her Skill again without cooldown. The Burst cancel also activates Skill-use triggers, such as Crimson Witch or Kagura’s Verity.
 Elemental Burst | Sparks ‘n’ Splash
Talent Description
Klee’s Blazing Delight! For the duration of this ability, continuously summons Sparks ‘n’ Splash to attack nearby opponents, dealing AoE Pyro DMG.
With Hexerei buffs, Klee relies on her Burst more than ever, also adding a substantial amount of damage to her combos.
 Ascension 1 Passive | Pounding Surprise
Talent Description
When Jumpy Dumpty and Normal Attacks deal DMG, Klee has a 50% chance to obtain an Explosive Spark. This Explosive Spark is consumed by the next Charged Attack, which costs no Stamina and deals 50% increased DMG.
Hexerie Buff
When Klee’s Elemental Skill Jumpy Dumpty and Normal Attacks deal DMG, there is a 50% chance to grant her an Explosive Spark. Using her Elemental Skill Jumpy Dumpty or Elemental Burst Sparks ‘n’ Splash also grants 1 Explosive Spark. Klee can hold up to 3 Explosive Sparks.
While holding an Explosive Spark, Klee’s Charged Attack will consume 1 Spark to perform a special stamina-free Charged Attack, Boom-Boom Strike, dealing 50% increased DMG.
Hexerei: Secret Rite
During the duration of Klee’s Elemental Burst Sparks ‘n’ Splash, her Normal Attack sequence does not reset. If Klee holds an Explosive Spark while performing Normal Attacks, the third attack in the sequence will consume 1 Spark to unleash an additional attack equivalent to Boom-Boom Strike.
With Hexerei buffs, Klee’s A1 Passive allows three Sparks to be carried at once. In addition, extra Sparks are obtained on both her Skill and Burst casts.
Having a Spark causes the next Charged Attack to convert into a Boom-Boom Strike, which has an extra DMG Bonus.
Pairing her with another Hexerei character activates the Secret Rite effect, which causes the third Normal Attack in the sequence to consume a Spark, launching an additional animation-free Boom-Boom Strike.
 Ascension 4 Passive | Sparkling Burst
Talent Description
When Klee’s Charged Attack results in a CRIT Hit, all party members gain 2 Elemental Energy.
Only CRIT hits grant Energy, so this passive incentivizes building enough CRIT Rate on her.
Witch’s Eve Rite Passive | Sparkborne Magic
Talent Description
After completing Witch’s Homework: Of Leaves That Spark, Klee will become a Hexerei character. When the party includes at least 2 Hexerei characters, you will gain the Hexerei: Secret Rite effect, which enhances Hexerei characters.
Hexerei: Secret Rite
When Klee deals DMG with Normal Attacks, Elemental Skills, or Elemental Bursts, she gains 1 Boom Badge, lasting 20s. Each type of attack can grant at most 1 Boom Badge this way, and each badge has its own independent timer. While Klee has 1/2/3 Boom Badges, her special Charged Attack Boom-Boom Strike deals 115%/130%/150% of its original DMG.
Pairing Klee with another Hexerei character activates the Secret Rite effect, which increases all Boom-Boom Strikes’ final damage.
When her Normal Attack, Skill, or Burst deals damage, she will gain one Boom Badge. Every attack type can grant at most one Boom Badge, each with an independent 20s timer. To maximize this passive, her Normal Attack, Skill, and Burst should all be used less than 20s before her Boom-Boom Strikes.
Constellations
 Constellation 1 | Chained Reactions
Constellation Description
Attacks and Skills have a certain chance to summon sparks that bombard opponents, dealing DMG equal to 120% of Sparks ‘n’ Splash’s DMG.
Hexerei Buff
Attacks and Skills have a certain chance to summon sparks that bombard opponents, dealing DMG equal to 120% of Sparks ‘n’ Splash’s DMG. For 12s after triggering the above effect, Klee’s ATK is increased by 60%.
This is an incredible damage increase for Klee that can be obtained for free with the 5-star Constellation selector. Note that this Constellation may have a lower value in teams with Bennett due to ATK saturation. Nevertheless, this is still a hefty increase to Klee’s damage.
 Constellation 2 | Explosive Frags
Constellation Description
Being hit by Jumpy Dumpty’s mines decreases opponents’ DEF by 23% for 10s.
Hexerei Buff
When Klee’s Elemental Skill hits an opponent, that opponent’s DEF will be decreased by 23% for 10s.
Klee’s C2 provides a decent damage increase for her entire team and is among her best Constellations. It also improves her ability to act as a support in certain teams, due to the nice DEF Shred it provides.
 Constellation 3 | Exquisite Compound
Constellation Description
Increases the Level of Jumpy Dumpty by 3.
Maximum upgrade level is 15.
With tighter DPS checks becoming increasingly common, Klee has fewer opportunities to finish a battle with one or two rotations. In such cases, Klee’s second Skill charge doesn’t provide as much value. Overall, this Constellation is not significant.
 Constellation 4 | Sparkly Explosion
Constellation Description
If Klee leaves the field during the duration of Sparks ‘n’ Splash, her departure triggers an explosion that deals 555% of her ATK as AoE Pyro DMG.
Hexerei Buff
An explosion will be triggered if Klee leaves the field while Sparks ‘n’ Splash is active or when Sparks ‘n’ Splash ends, dealing 555% of ATK as AoE Pyro DMG. If Klee is on-field when the explosion occurs, its DMG will be increased by 100%.
This is a decent Constellation, as it allows Klee to swap out earlier in a rotation while rewarding some additional damage. If Klee stays on the field while the Burst ends, her C4 will receive a 100% DMG Bonus. While substantial, do keep in mind that most team buffs will expire by the time her Burst has ended. On the other hand, this Constellation has high value in quickswap teams.
 Constellation 5 | Nova Burst
Constellation Description
Increases the Level of Sparks ‘n’ Splash by 3.
Maximum upgrade level is 15.
While Klee’s Burst is an essential part of her kit, the Burst damage itself isn’t a huge part of her damage. But an increase is always appreciated.
 Constellation 6 | Blazing Delight
Constellation Description
While under the effects of Sparks ‘n’ Splash, Klee will regenerate 3 Energy for all members of the party (excluding Klee) every 3s.
When Sparks ‘n’ Splash is used, all party members will gain a 10% Pyro DMG Bonus for 25s.
Hexerei Buff
While under the effects of Sparks ‘n’ Splash, Klee will regenerate 3 Energy for all members of the party (excluding Klee) every 3s.For 25s after Sparks ‘n’ Splash is used, all other party members will gain a 10% Pyro DMG Bonus, and Klee will gain a 50% Pyro DMG Bonus.
Hexerei: Secret Rite
- When Klee uses an Explosive Spark, there is a 50% chance it will not be consumed. Additionally, while Sparks ‘n’ Splash is active, Klee’s Normal Attacks have a 40% chance on the first and second hits to consume an Explosive Spark, dealing an additional attack equivalent to Boom-Boom Strike to her opponent(s).
C6 is on-field Klee’s best Constellation, with a multitude of effects. Not only does it provide 9 flat Energy to the team, 10% Pyro DMG Bonus for teammates, and 50% Pyro DMG Bonus for Klee herself, but it also significantly increases the amount of Spark-buffed Charged Attacks she can perform per rotation.
C1 or R1*
Klee’s C1 generally offers a bigger damage increase than any 5-star weapon at R1. (See the Weapons section for Klee’s best weapons in each team.)
However, Klee’s C1 is accessible in the To Temper Thyself and Journey Far Event. If you are interested in investing in Klee, there is little reason to skip this, making the real decision between C2 and C1R1. In this case, C2 is always better because it benefits all team damage.
*R1 signifies her best 5-star weapon in her team. See the weapons section for more detailed information.
Combos
Combo Notation
- N = Normal Attack
- N#n = The nth Normal Attack in a Normal Attack sequence
- C = Charged Attack
- E = Elemental Skill
- sE = Early cancelled Elemental Skill using Burst
- Q = Elemental Burst
- D = dash (cancel)
- J = jump (cancel)
- W = walk (cancel)
- > = switch character
- ( ) = these actions are optional; please refer to the notes below
- [ ] = repeat these actions the specified number of times
Cancels
| sEQ vs EQ | With Hexerei buffs, the Skill cancel can be used to get one extra Spark for her combos, allowing her to do more damage and additional Charged Attacks. |
| N#3 E N#1 | The third attack in the sequence has a longer animation, but can be cancelled early using a Skill, which in turn can be canceled with another Normal Attack. |
| N#1C, N#2C and N#3C | Both N#1 and N#2 can be cancelled early into a Charged Attack, but the third attack can’t, so it is not advised to use a Charged Attack after the third Normal Attack. |
| CDC (with 1 Spark) | This strategy was found in the Chinese community and lets Klee perform 2 Stamina-free Charged Attacks while only consuming 1 Spark, if executed fast enough. This is due to the timing of the Spark consumption. Note that with Hexerei buffs, it will consume more than one Spark if Klee has them, so use it only if she has one Spark left. Despite both Charged Attacks being Stamina-free, only one of them will actually become a Boom-Boom Strike. |
| N#2 C N#3 (with 1 Spark) | This cancel abuses the same phenomenon as above. Thanks to how the Spark is consumed, this results in two Boom-Boom Strikes for only one Spark. Use only if Klee has exactly one Spark. |
| Dash or Jump cancels | Klee can dash or jump after any Normal Attack, Charged Attack, or Skill, but with the post-buff Normal Attack animations, it’s slower than simply using Normal Attacks to cancel. Use the jump and dash cancels only to move while in battle. |
Why improvising is better than using combos
While Klee has combos to maximize her damage potential, it’s better to know what every attack and cancel does to adapt to any situation. For example:
- Against small enemies (e.g. hilichurls, samachurls), use Normal Attacks and dash cancels to follow them as they fly away.
- Against middle-sized and elite enemies (e.g. lawachurls, Humanoid Legends), use as many Charged Attacks as possible to maximize poise damage and knock them down.
- Against bosses, time Klee animations with some of the boss attacks, using dash cancels to dodge its attacks.
- Use the second Skill in the last rotation of the fight. The charge is needed for the sEQ cancel in other rotations.
That being said, the general strategy is to use Normal Attacks while Klee has a high number of Sparks (2 or 3), and using Charged Attack cancels when she has 1 or no Sparks left.
Standard Combos
| Normal Attack Spam: N1 sEQ N3 E 5[N3] | Her easiest combo. Klee’s fast attack speed allows her to fit six full Normal Attack strings into the Burst duration (assuming no interruptions). This combo gets 5 additional Charged Attacks easily without needing to time things. |
| 1 Phantom Spark: N1 sEQ N3 E 3[N3] N2C N#3 | One step forward from the Normal Attack Spam combo, this one uses the N#2 C N#3 cancel to get another Boom-Boom Strike for extra Energy and higher damage. One CDC cancel can also be used instead of a regular Charged Attack, but the timing is extremely tight. This combo performs slightly better than the Normal Attack spam, but its complexity might make it hardly worthwhile for regular gameplay. |
| Extra CA Energy: N1 sEQ N3 E 2[N3] N#1 N#2C N#3 N#1C N2 | This combo optimizes the Sparks, using Normal Attacks when Klee has more of them and Charged Attack cancels when she is low on them to get extra Energy from her A4 passive. |
| Charged Attack Combo: (N1C) N1 sEQ N#1C N#2C N#3 E N2C N#3 N2C N#3 | This combo deals a lot of poise damage to the enemies and can trigger two Phantom Spark Boom-Boom Strikes with good RNG. Since Klee has standard ICD for Normal Attacks but no ICD for Charged Attacks, she benefits greatly from Charged Attacks in reaction teams due to the increased reaction triggers. In reaction teams, performing one Charged Attack at the start of the combo increases damage, but also increases her on-field time. |
Artifacts
ER Requirements
| No Favonius | With Favonius Support | |
| Klee + 1 Pyro | 125–140% | 110–130% |
| Klee + 2 Pyro | 115–130% | 100–120% |
| Solo Pyro | 140–160% | 115–130% |
Note: C6 Klee reduces her own ER requirements by about 20% and her teammates’ ER requirements by about 50%.
Use the Energy Recharge Calculator to determine exact requirements for your team and rotation. For more details on how Favonius weapons will affect your team, please use Ac1d’s Favonius Mastersheet.
Artifact Stats
 Sands |  Goblet |  Circlet |
| ATK% | Pyro DMG Bonus / ATK% | CRIT Rate / CRIT DMG |
Stat Priority: ER (until requirements) > CRIT > ATK%
In teams with a significant amount of DMG% buffs (e.g. Furina teams) and few ATK buffs, an ATK% Goblet may be considered.
Artifact Sets
 A Day Carved From Rising Winds (Rising Winds) | Klee’s best set in almost any team. The massive ATK% and CRIT Rate boost propel Rising Winds ahead of any other options. |
 Crimson Witch of Flames (CW) | A good option for reaction teams because of the Reaction Bonus it provides. Thanks to the sEQ cancel, 2 stacks are guaranteed for every rotation. |
 Marechaussee Hunter (MH) | An alternative to Rising Winds for Furina teams. The extra CRIT Rate, as well as the Normal and Charged Attack DMG Bonus, are especially useful for her. |
 Night of the Sky’s Unveiling (NotSU) | This set limits teams to include either Ineffa or Columbina (or both), but provides exactly what Klee needs in such teams, such as plenty of CRIT Rate and EM. It is important to note that even if the full buffs of the set are not activated, it remains a strong set. |
 Unfinished Reverie (UR) | A good option, but limited to Burning teams. As always, DMG Bonus is good for any DPS, and Klee is not an exception. In addition, this synergizes well with Bennett (who will almost always be used in such teams), as his ATK% buff complements the DMG Bonus that UR provides. |
 Any combination of 2pc ATK%, 2pc MH, or 2pc Pyro DMG Bonus | Mixed 2pc sets perform much worse than the Rising Winds (assuming the same substats), but they are more likely to have better substats than a full set until you have farmed enough pieces. 2pc ER (e.g. Emblem or Silken Moon) sets are also viable for certain teams with low Energy generation. |
 Gilded Dreams | These two sets generally perform worse than CW. However, they are good placeholders, especially since you might have these lying around while farming for other characters. Note that they usually perform worse than mixed 2pc sets unless playing a reaction team. |
 Wanderer’s Troupe | |
 Fragment of Harmonic Whimsy (Whimsy) | This set can be one of the best when holding Flowing Purity and having a low-heal-tick healer like Chevreuse. Note that this is relatively niche. |
 Support Set | These are options for a support Klee. Instructor is the most commonly used set, though any of the aforementioned sets can work, depending on the team. |
Weapons
 5★ Reliquary of Truth | Klee’s best generalist weapon. It has a high CRIT DMG secondary stat, as well as a nice CRIT Rate stat too. The extra EM that Reliquary offers is especially good for reaction teams. |
 4★ The Widsith | Klee’s best generalist 4-star. It works in every team and performs close to other 5-star options. Both its high CRIT DMG secondary stat and passive make it extremely strong, even though it can only be triggered every two rotations, and only 2 of the 3 buffs are useful for Klee. However, the latter can be managed with either good RNG or enough resets. |
 5★ Cashflow Supervision | In Furina teams, this weapon is a massive upgrade for Klee, especially with Hexerei buffs, as she benefits more from Cashflow’s Normal Attack buffs due to the increase in Normal Attacks that she performs. Having Normal and Charged Attack DMG Bonus, as well as ATK SPD, ATK%, and CRIT Rate (which complements Klee’s A4 Passive), this weapon has everything Klee wants. This is Klee’s best weapon in Furina teams, where Klee has low ER requirements. |
 5★ Tome of the Eternal Flow | Limited to Furina teams, the old reliable. This weapon is similar to Cashflow, though it only gives a Charged Attack bonus. However, Tome makes up for it with flat Energy (from its passive) and high CRIT DMG (from its secondary stat). This is Klee’s best weapon in Furina teams, where Klee has high ER requirements. |
 5★ Vivid Notions | This weapon is generally good and competitive with Reliquary of Truth, but it is usually worse and not usable in every team. The high Base ATK and ATK% buff make this weapon a good substitute. Although the Plunge DPS playstyle is not covered in this guide, this is the best weapon when playing Plunge DPS Klee. |
 4★ Dawning Frost | Dawning Frost is limited to reaction teams with Bennett, but it acts like Widsith with its passive always buffing EM, eliminating the RNG aspect of Widsith’s passive. In such teams, it usually performs better than Widsith. |
 5★ Lost Prayer / Kagura / Tulaythullah | These three weapons are good on Klee, but perform worse than all the weapons listed above in most cases. They are still good options, especially if you are not willing to deal with Widsith’s RNG. |
 4★ Flowing Purity | Her best F2P alternative, but it requires healing for its passive. It gives a substantial amount of DMG Bonus and Bond of Life, which can be used along with Whimsy for a huge damage boost. However, its performance is subpar without Whimsy. |
 3★ TTDS / 4★ Evenstar | The 2 weapon options used when playing support Klee. Choose based on your rotation and team damage spread. Other alternatives, like A Thousand Floating Dreams or Hakusin Ring, are viable when supporting a DPS that doesn’t scale off ATK. |
Teams
Rotation Notation
- N = Normal Attack
- N#n = The nth Normal Attack in a Normal Attack sequence
- C = Charged Attack
- E = Elemental Skill
- sE = Early cancelled Elemental Skill using Burst
- hE = Hold Skill
- Q = Elemental Burst
- D = dash (cancel)
- J = jump (cancel)
- W = walk (cancel)
- > = switch character
- ( ) = these actions are optional; please refer to the notes below
- [ ] = repeat these actions the specified number of times
Teambuilding
- Only teams of the on-field DPS Playstyle will be featured in this section.
- It is recommended to bring at least one Favonius weapon among the teammates in Klee teams.
- Klee will always need to be paired with another Hexerei character, which will be covered when talking about her teammates for each archetype.
Klee Overload (“Kloverload”)
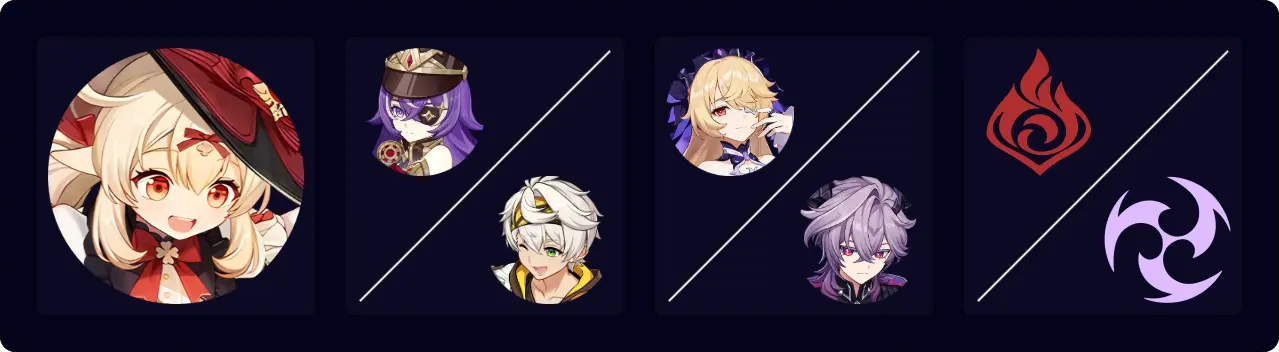
The strongest Klee archetype with the new Rising Winds. Chevreuse is recommended, but not needed. C6 Chevreuse and Fischl boost damage by a good amount, but they are not a must-have. An Electro character with off-field Electro application is needed to maintain good uptime on Chevreuse’s RES Shred.
The archetype name comes from the words “Klee” and “Overload” to form the word “Kloverload”.
Notable Teammates
 Chevreuse | Chevreuse’s RES Shred, ATK% buff, DMG Bonus at C6, batterying capabilities with Favonius Lance and C1, and healing make her a very strong support for Klee, albeit with the teambuilding restriction of running a team with only Pyro and Electro characters. |
 Fischl | Fischl provides strong off-field Electro application, generates many particles, and enables Klee’s Hexerei buffs via Secret Rite. Fischl’s Hexerei Passive (doubled at C6) buffs Klee’s ATK while Oz is on-field. Even when there are enough Hexerei characters to activate Secret Rite, she is still a great option. Fischl can hold Sacrificial Bow to better fit shorter rotations in teams with Klee. This results in higher Oz uptime, leading to higher damage and lower ER requirements (5% less from more persistent particle generation). Note that Overload teams with 16-18s rotations require R4+ Sacrificial Bow for its passive’s cooldown. The size of Sacrificial Bow’s upgrade over options like Stringless and Skyward Harp depends on the team. However, Fischl may prefer more damage-oriented Bows in teams with Bennett since Oz can snapshot his buff. |
Durin | Durin’s RES Shred, particles, strong off-field damage, and decent Pyro application make him great for Klee teams. In addition, he can enable Secret Rite for Klee, eliminating the need for another Hexerei teammate. |
 Bennett | As always, Bennett is a top-tier support for any Pyro DPS. His high ATK buff, healing, Pyro particles, and Pyro DMG Bonus at C6 make him a prime support. In addition, he can activate Pyro Resonance with Klee, providing her with yet another ATK% buff. The only downside to using Bennett is that Klee will be limited inside his Burst radius (lest she miss out on a massive Flat ATK buff), which is especially restrictive in Overload teams. |
Other Electro Options
Off-field Electro application is needed to maintain Chevreuse’s RES Shred. Besides Fischl, there are only a few options that can fill that role. Yae is the best alternative, but Kuki and Raiden can be used too. Ororon is not a good option due to the lack of Natlan characters to activate his attacks and Scroll.
Iansan is a nice option if paired with Fischl.


Other Pyro Options
There are good alternatives if you don’t have Durin and Bennett, or if they are already on another team. Mavuika can provide decent off-field damage, hold Scroll, and provide DMG Bonus with her Burst. Pyro Traveler can also hold 4pc Scroll. Xiangling has modest Pyro RES Shred and competitive off-field damage.


Example Teams
This is not a comprehensive list of teams. The inclusion or exclusion of any given team does not necessarily reflect its power level.

One of Klee’s best teams. Durin uses his Burst later in the rotation after Fischl to receive Fischl’s buff earlier during his Burst uptime. You can make use of additional Chevreuse hE to reduce ER requirements.
Sample Rotation
(Fischl E)¹ > Durin EE > Fischl N1 Q/E³ > Durin Q > Chevreuse Q hE > Klee Combo²
¹Only first rotation or with Sacrificial Bow.
²See Combos section.
³Burst every rotation if using Sacrificial Bow.

Easily one of Klee’s best teams despite having only 4-stars. While Chevreuse’s C6 is extremely strong, note that it is not required to make use of this team, especially with limited rosters.
Sample Rotation
Bennett EQ > Fischl N1 Q/E > Chevreuse Q hE > Klee Combo¹
¹See Combos section.
Furina Teams (“Kleerina”)

Furina teams let Klee use MH as an alternative and stronger weapon options. Klee’s strong Pyro application and Energy generation help Furina deal high Forward Vaporize damage. With Hexerei Buffs, Klee needs another Hexerei teammate, and since there are no Hexerei healers currently, a flex healer unit is a must in a team with Furina.
The archetype name comes from the words “Klee” and “Furina” that resemble the word “ballerina”, which describes Furina’s Salon Members around Klee.
Hexerei Options
While all of them work, the first three characters listed perform much better than the latter three.
Fischl | Klee’s best Hexerei partner. Her high ATK% buff, strong off-field Electro application, and Energy generation help Klee Vaporize even with Furina’s low Hydro application, and also let her deal good damage. Sacrificial Bow is also a nice option here for the same reasons listed previously (see Chevreuse Overload teams). Either Fischl or Furina can hold Tenacity of the Millelith to act as a support for the team, or hold Golden Troupe to act as an off-field DPS. |
 Albedo | Albedo usually performs worse than Fischl at C0, but his Constellations are free with the 5-star Constellation selector, and he can be paired with Xilonen as the healer to increase his potential even further. Provides both damage and buffs. Due to his Hexerei A4 passive, he prefers Husk thanks to the DEF% it provides, but Golden Troupe is fine, especially at C1+. Cinnabar Spindle and Ezpitzal Flute are good options for him. |
Durin | Durin’s RES Shred is not triggered by Vaporize, and he doesn’t Shred Hydro RES, so he doesn’t synergize well with Furina. Nevertheless, Durin is still a valid option if paired with a non-Pyro/Hydro/Cryo healer or if played as Dark form Durin. As a Burst-focused off-fielder, his synergy with 4pc Noblesse Oblige is noteworthy, and the buff it provides is appreciated. |
 Sucrose | Sucrose’s Hexerei buff is not strong, and she can’t easily double Swirl with Furina. However, she can hold TTDS or Favonius Codex, and provide Pyro and Hydro RES Shred for both Klee and Furina, making her a good choice. |
 Venti | Venti has some strengths in this slot: he is both a Hexerei character and provides RES Shred, excellent grouping, and some Energy generation. However, he provides fewer buffs than other Hexerei supports. |
 Mona | As a Hexerei character, Mona can hold either TTDS, Prototype Amber, or Favonius Codex, as well as provide the team with the Omen buff. However, she doesn’t reliably work with Klee. She is worse than Fischl and, with Constellations, performs at the same level as C0 Dark form Durin. |
Healer Options
Reaching Furina’s Fanfare limit is not a must. Xilonen and Bennett are the best healer options, providing great buffs along with (though single-target) high healing. If C6, Chevreuse can also work as a healer despite not being slotted in a full Pyro and Electro team, working better if paired with Fischl. A teamwide healer, such as Xianyun or Sigewinne, can also work, even though they don’t provide as many buffs for the team.
Xilonen | Bennett | C6 Chevreuse |  Teamwide Healer |
Example Teams
This is not a comprehensive list of teams. The inclusion or exclusion of any given team does not necessarily reflect its power level.

One of the best Klee teams. Xilonen enhances Albedo’s damage capabilities, and he gives DMG Bonus for the whole team. Xilonen can also wield Favonius Sword to battery Klee and Furina, allowing them to focus on offensive stats.
Sample Rotation
(Klee N1)¹ > Xilonen EN2 Q > Furina EDQ > Albedo EQ > Xilonen EN2 > Klee Combo²
¹Only first rotation.
²See Combos section.

This is also one of Klee’s best teams. While Klee’s own Vaporize triggers in this team are not substantial, they are still significant enough to make a big difference. In addition, Fischl provides amazing buffs and personal damage.
Sample Rotation
(Fischl E)¹ > Furina EDQ > Bennett QE > Fischl N1 Q/E² > (Furina N2)³ > Klee Combo⁴ > Bennett E
¹Only first rotation or with Sacrificial Bow.
²Burst every rotation if using Sacrificial Bow.
³Optional to heal Furina for extra Fanfare.
⁴See Combos section.
Reaction Teams

These teams rely on how Elemental auras work to mitigate Pyro application, which ensures a consistent Hydro aura. Fischl is the ideal Hexerei character in this setup, but Durin works too. With this, Klee can trigger Vaporize to boost her damage. Note that even with an active Hydro aura, Klee has standard ICD, meaning that at most, only one third of her hits will actually Vaporize. This makes an EM sands not recommended, as other stats will have a much bigger impact on her damage.
Notable Teammates
Fischl | The queen of these teams. She provides both an ATK% and EM buff, as well as Energy generation and Electro application for Klee to Overvape with the Electro-Charged aura. Sacrificial Bow is also a nice option here — often the best option — for the same reasons listed previously (see Chevreuse Overload teams). Due to Klee’s significant damage share in these teams, her best option is often 4pc Tenacity of the Millelith. |
 Yelan | Yelan has both high off-field damage and good Hydro application to enable Vaporize. She also provides an extra damage buff for Klee while her Burst is active. While her off-field damage is higher than Xingqiu’s, she still prefers to hold a support set like 4pc Noblesse Oblige. |
 Xingqiu | Xingqiu provides lots of Hydro application and decent off-field damage, as well as some damage mitigation and interruption resistance. Like Yelan, he works best with a support set. |
 Ineffa | Ineffa enables Lunar-Charged for the team and provides a shield. Her off-field damage is high, and she can provide EM buffs for the party. She is usually used with Silken Moon, but Tenacity of the Millelith is also fine. When used with Xingqiu, her shield strength is, in effect, dramatically improved. Lastly, she allows Klee to use NotSU. |
Columbina | Columbina also enables Lunar-Charged for the team and can hold Prototype Amber to heal her teammates or Favonius Codex to give some extra energy. Though she provides some partywide buffs, her minimal Hydro application requires another Hydro unit to sustain Vaporize. However, with Ineffa, she can act as the sole Hydro unit thanks to the extra Gravity that Ineffa provides. Like Ineffa, she enables NotSU Klee, albeit with lower personal damage. |
Durin | Durin can be played using either White or Dark form in this team. Overvape is the only way White form Durin can provide RES Shred in Vape teams. However, sustaining a Hydro aura with both Durin and Klee’s Pyro application requires very strong Hydro application, such as Xingqiu. In such Overvape teams, White form Durin’s Electro and Pyro RES Shred is preferred. On the other hand, Dark form Durin’s slower Pyro application works more consistently with weaker or slower Hydro appliers, providing more personal damage for Durin. He works well with 4pc Noblesse Oblige or Rising Winds. Overall, White form Durin should be played in an Overvape team for party-wide buffs. Dark form Durin should be played for personal damage |
Other Options
Example Teams
This is not a comprehensive list of teams. The inclusion or exclusion of any given team does not necessarily reflect its power level.

One of Klee’s best teams is Kleebineffa. Thanks to the synergy between Columbina, Ineffa, and Lunar-Charged, Klee can Vaporize a good portion of her Charged Attacks. Klee’s best artifact set in this team is still Rising Winds, but NotSU is not far behind. Yelan and Xingqiu are good substitutes for Columbina.
Sample Rotation
(Fischl E)¹ > Ineffa QE > Columbina EQ > Fischl N1 Q/E³ > Klee Combo²
¹Only first rotation or with Sacrificial Bow.
²See Combos section.
³Burst every rotation if using Sacrificial Bow.

For a team consisting of 1.0 characters, this team performs surprisingly well. Xingqiu’s amazing Hydro application allows Klee to Vaporize all her Charged Attacks, which are further buffed by Bennett and Fischl.
Sample Rotation
(Fischl E)¹ > Xingqiu EDQN1 > Bennett N1EQ > Fischl N1 Q/E³ > Klee Combo² > Bennett E
¹Only first rotation or with Sacrificial Bow.
²See Combos section.
³Burst every rotation if using Sacrificial Bow.
Burning Teams

This playstyle generally performs worse than the other three, but it is still viable. In addition, this playstyle has stronger Pyro application (as well as a continuous Burning aura) that could be good against some enemies like the Lava Dragon.
Playing Burning teams lets Klee use UR. Burning teams are not tied to Emilie, but they are not very good without her.
Hexerei Options
Similar to Furina teams, almost any Hexerei characters can be used here, but Durin is the best option. He provides RES Shred for both Emilie and Klee and has nice off-field damage as well. The other options follow the same order.
Flex Options
A Pyro support is preferred, as Klee and Emilie synergize better with them thanks to Pyro Resonance and the buffs they provide. However, it is flexible, and an especially good or well-built support can work.
Example Teams
This is not a comprehensive list of teams. The inclusion or exclusion of any given team does not necessarily reflect its power level.

The best Burning Klee team. As stated earlier, Burning teams are viable but not as good as some of the other options listed.
Sample Rotation
Durin EEQ > Emilie E/Q > Bennett QE > Klee Combo¹ > Bennett E
¹See Combos section.
Credits
Writer(s): mystathi, enigwa, and cpm2486
Contributors: soloxcx, marteen., meowtews, jamie9248, pulsar79., and ilkuni
Team images made with the KQM portrait generator.